


You've got a new strap in one hand and your watch in the other, but the box either included no installation instructions or supplied only a wordless diagram. The safe approach is simple: identify the fitting first, install the strap on a table, then confirm the click, tug, and flush fit before wearing the watch.
A strap that looks attached can still be loose. These installation instructions focus on the physical work that matters, with separate steps for standard spring bars, Apple Watch channels, Fitbit pin systems, and Garmin QuickFit connectors.
Table of Contents
- How do I identify my watch fitting type
- What are the exact steps to attach my specific strap
- How can I verify the strap is actually secure
- What are the most common installation mistakes and how do I fix them
- Which tools do I need for sizing and non-quick-release straps
- How do I maintain comfort and prevent skin irritation
How do I identify my watch fitting type
Apple Watch, Fitbit, Garmin, and Samsung Galaxy Watch straps use different attachment systems, so look at the underside of the watch case before touching the new strap. Standard lugs have two open points with a spring bar between them, while a quick-release version has a tiny lever on the underside of the bar. Apple Watch has a slide-in channel, Fitbit commonly uses a pin or latch, and Garmin QuickFit uses a connector with a latch that closes over a pin on the watch.
Before installation, confirm the exact model and width in millimeters. Common smartwatch strap widths cluster around 20 mm and 22 mm, but Samsung's compatibility information maps different watch case sizes to different widths, so a strap can be the wrong fit even when it looks close. Use the model specifications, inspect the old strap markings, or measure the inside distance between the lugs with a ruler or caliper. Samsung's smartwatch strap compatibility guidance is useful when a Galaxy Watch case size is unclear.
Don't force a 22 mm strap into a 20 mm case, or the reverse. The width needs to match before you start the mechanical fitting.
Apple Watch straps are matched by case size rather than lug width, and Apple groups straps by compatible case families rather than treating every strap as interchangeable. Apple's Change your Apple Watch strap guide lists which case sizes share straps. Garmin requires similar care because ordinary quick-release straps and QuickFit straps aren't the same connector type. For example, the Garmin Venu 3 45 mm version uses 22 mm quick release, while the 41 mm version uses 18 mm quick release. Neither should be described as QuickFit.
What are the exact steps to attach my specific strap
Place the watch face-down on a clean, well-lit table before fitting any strap. A folded cloth gives the case a stable surface and helps prevent scratches if the watch shifts. Installing over your wrist makes it harder to see the lug holes and gives a dropped spring bar more opportunities to disappear.
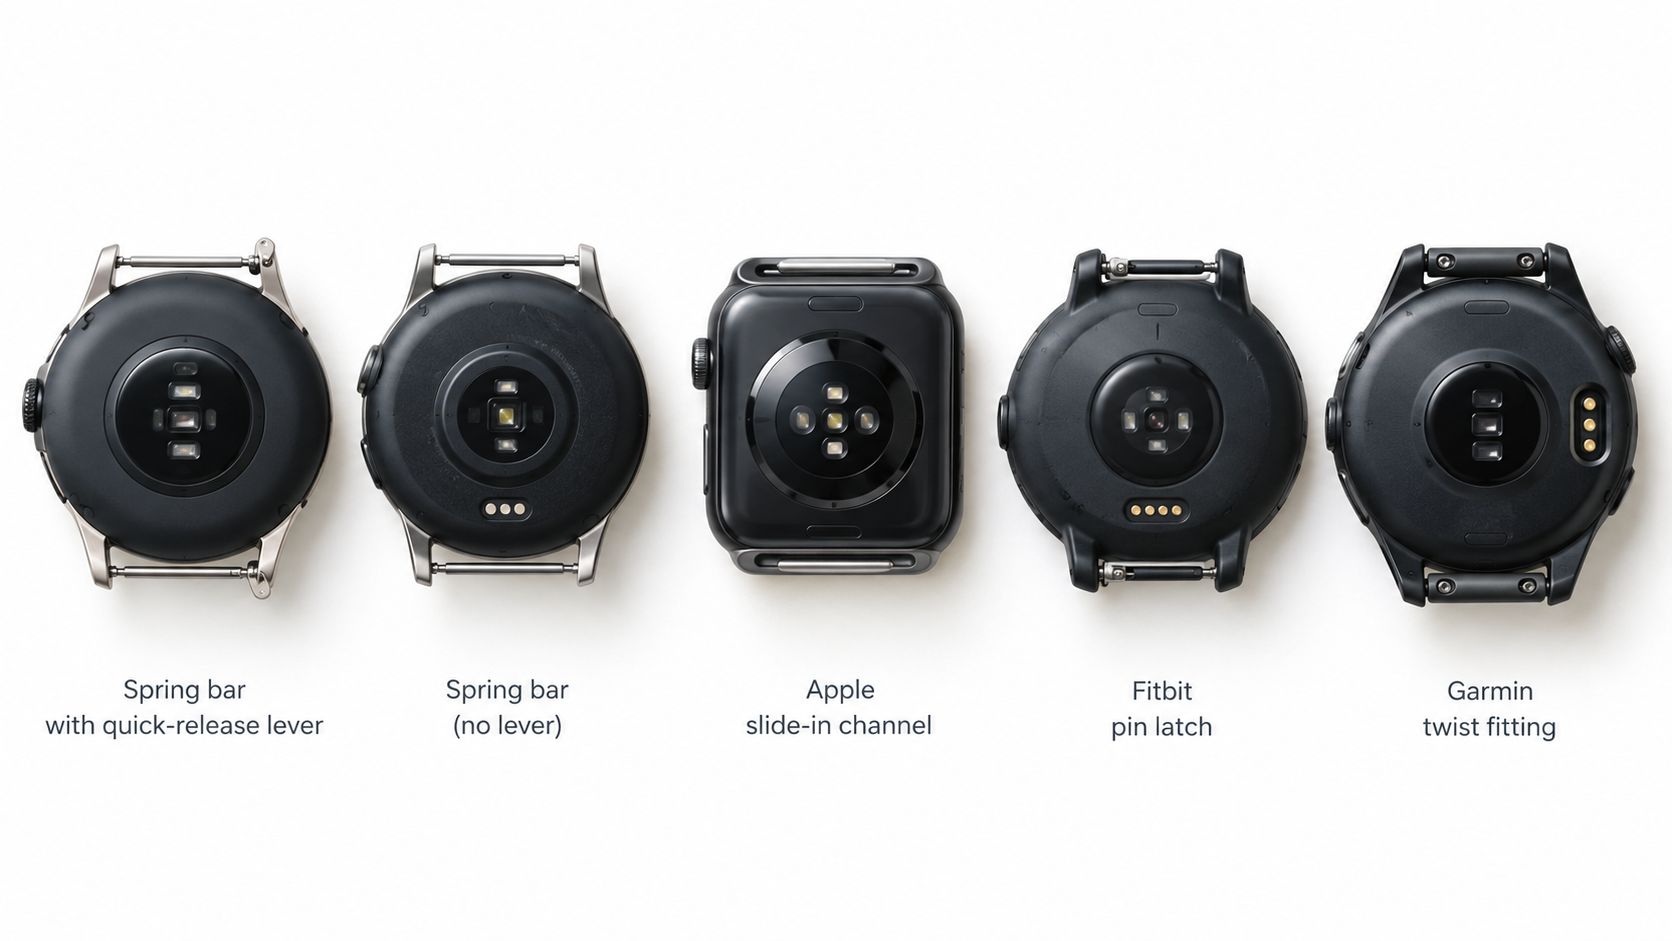
Standard spring bar with a quick-release lever
Hold the strap close to the end where the spring bar sits. Press the small lever inward with your fingertip to retract the spring bar, place one end of the bar into the lug hole, then guide the opposite end into its recess. Release the lever slowly. The bar should spring outward and make a distinct click as it locks.
Quick-release straps use a spring bar with a small lever, so you don't need a separate spring-bar tool for the fitting itself. The principle is always the same: retract the pin, seat the strap, and let the pin return into the lug hole.
Standard spring bar without a lever
A plain spring bar needs a spring-bar tool. Position the strap between the lugs, place one end of the bar into its hole, and use the tool to compress the other end while guiding it into the opposite hole. Keep the tool pointed toward the bar, not against the watch case. Once the end enters the hole, remove the pressure carefully so the bar doesn't jump out.
The resistance should come from compressing the spring bar. If you feel the tool scraping the case or the strap is visibly too wide for the gap, stop and check the size rather than applying more force.
Apple slide-in channel
Hold the Apple Watch case securely with the back facing you. To take the old strap off, press and hold the strap release button on the back of the case and slide the strap across and out. To fit the new one, make sure the text on the strap faces you, align the connector with the channel, and slide the strap straight in until you feel and hear a click. No button press is needed to attach it.
Don't insert the strap at an angle or twist it while sliding. If the strap stops partway, remove it, check for debris in the channel, and start again with the connector level. Forcing a stuck Apple Watch strap can damage the channel or mark the connector.
Fitbit pin and latch
Fit the pin or latch into the matching recess on the Fitbit case. Keep the strap straight, press the pin inward in line with the release mechanism, and allow the latch to settle into place. The pin should sit fully inside its pocket rather than resting on the edge of the case.
Fitbit Charge, Versa, and Sense families use different release mechanisms, so don't assume that a pin movement from one Fitbit model applies to another. Charge 5 and Charge 6 share one fitting, Charge 3 and Charge 4 share another, Versa 3, Versa 4, Sense and Sense 2 share a third, and Versa, Versa 2 and Versa Lite share a fourth. Follow the shape of the connector you can see, and never press a pin diagonally when the mechanism calls for a straight push.
Garmin QuickFit latch
QuickFit straps latch in place rather than twist. To remove the old strap, slide the latch on the QuickFit strap open and lift the strap off the watch. To fit the new one, align it with the watch and press it onto the pin until the latch closes over the pin. The connector should sit evenly against the case, with no raised edge or partial engagement. Repeat on the other side.
Garmin ordinary quick-release straps use a different attachment method from QuickFit straps. Confirm the connector type before using these steps: a Garmin Venu 3 or Venu 3S needs the matching quick-release strap, not a QuickFit strap.
For a steady, level working surface, the same practical principle applies when setting out 12x12 stepping stones: place the work where you can see the alignment clearly before applying pressure.
How can I verify the strap is actually secure
A smartwatch strap is secure only after both ends pass a physical check. The installation isn't complete when the connector appears to be in position.
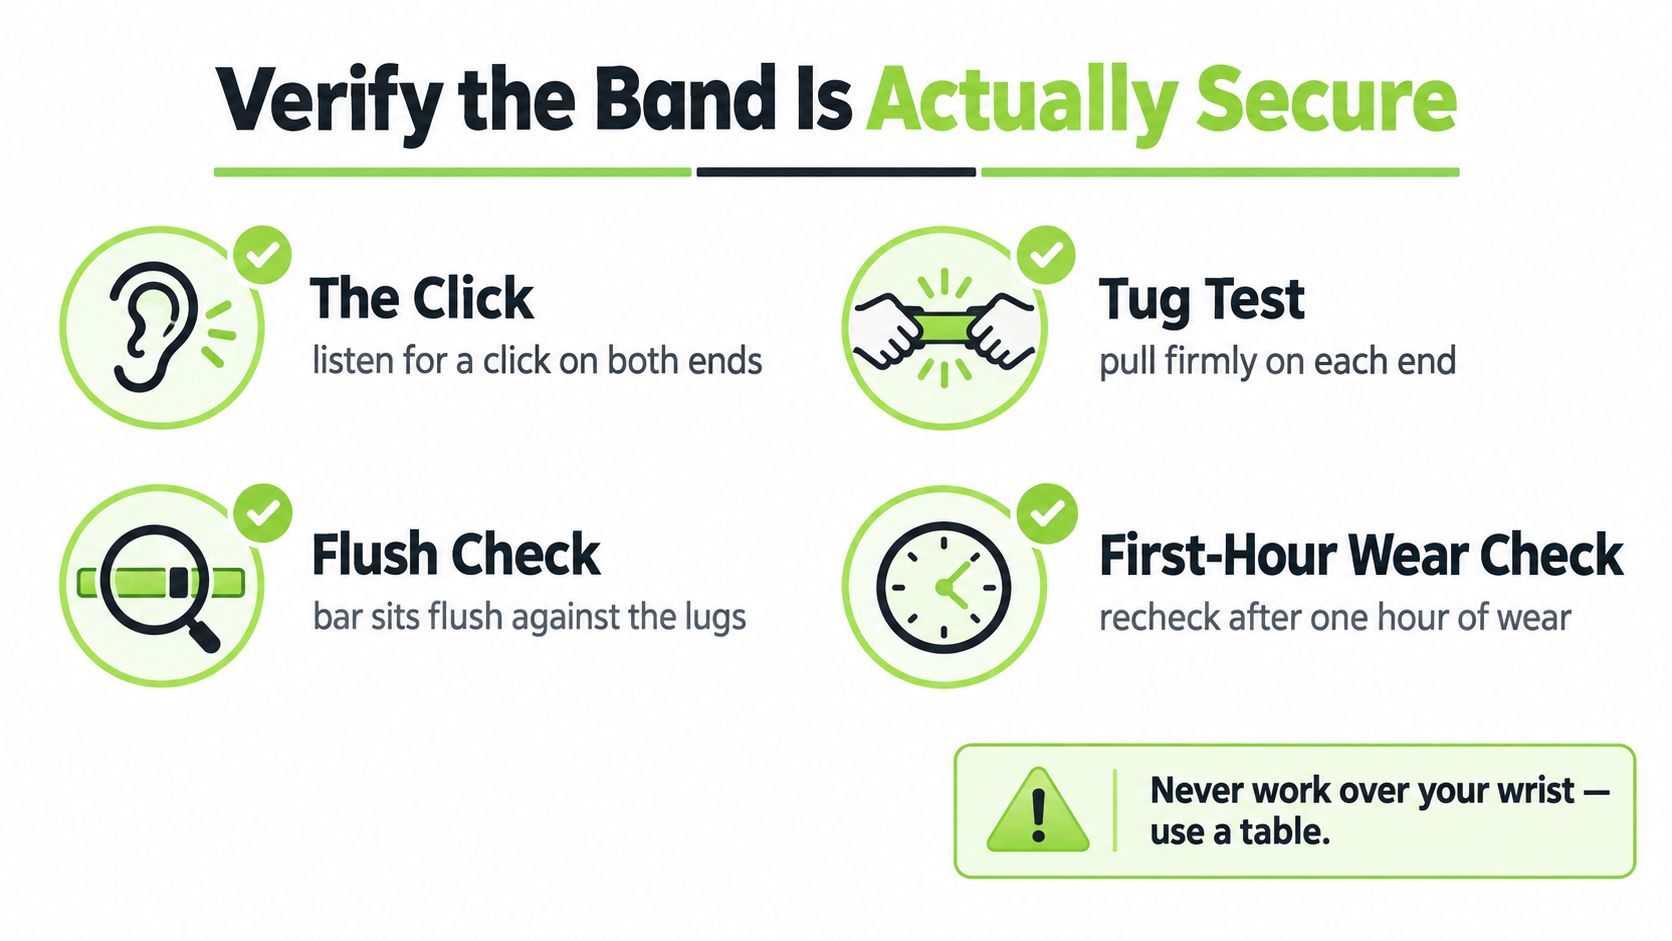
Listen for the click
Install one end at a time and listen for a clear click from each side. A click indicates that a spring bar, latch, or connector has moved into its locking position. It isn't proof by itself, but no click is a reason to stop and inspect the fitting again.
Perform the tug test
Hold the watch case in one hand and pull the installed strap away from the case with the other. Test both ends separately, using a firm, controlled tug rather than a violent yank. The strap shouldn't slide out, tilt away from the lug, or release when pulled.
Practical rule: Test both ends before the watch reaches your wrist. Finding a loose connector on the table is a small correction. Finding it after the watch falls is a preventable loss.
Check the lug fit
Look directly at the connection from the top and side. The strap or connector should sit flush against the lugs, with no visible gap, raised corner, or spring bar end resting outside its hole. A strap that sits unevenly may have the wrong width, an incompletely seated bar, or a connector that doesn't match the watch family.
Recheck during early wear
After the first hour of wear, inspect the connection again. Check whether the strap has shifted, whether either end has developed a gap, and whether the clasp or latch remains in its intended position. This is especially useful when the strap is new and the material is settling against the case.
A good fit also affects comfort and adjustment. Jacob Smith wrote about the Solin — Magnetic Milanese — Quick Release 20mm: "it's been a solid fit and really comfortable to wear; I can adjust it easily and it looks sharp on my wrist. Had a quick question about adjusting the size when I first got it, and the seller responded right away with helpful tips." The useful point is the combination of secure attachment, easy adjustment, and comfortable wear, not appearance alone.
What are the most common installation mistakes and how do I fix them
Most installation problems start with a mismatch or an alignment error, not a defective strap. Stop as soon as the fitting requires force that doesn't match the mechanism.
Wrong width forced into the lug gap
A 22 mm strap won't become a 20 mm strap because you press harder. Remove it without twisting, confirm the watch model and lug width, and compare the strap against the measured gap. Forcing the wrong width can deform the strap edge, stress the lugs, and leave the spring bar under an unsafe angle.
Tool levered against the case
A spring-bar tool should compress the bar, not act as a pry bar against the watch. If the tool slips, it can scratch the case or chip its finish. Reset your grip, support the watch on the table, and keep the tool's working end on the spring bar.
Knives and screwdrivers are poor substitutes for a correctly shaped spring-bar tool. They can slip into the case, mark the lugs, or damage the bar.
Bar appears seated but never clicked
Remove the strap and inspect both spring-bar ends. One end may be sitting on the outside of the lug rather than inside the hole. Reinstall it with one end seated first, compress the opposite end, and release it only when the tip is aligned with the recess. Repeat the tug test on both sides.
Apple strap forced along the channel
If an Apple Watch strap won't slide smoothly, don't force it along the channel. Press and hold the strap release button on the back of the case, slide the strap out, check for dirt or a misaligned connector, and reinsert it straight until it clicks. A connector that enters at an angle can bind before it reaches the locking point.
Fitbit pin pressed at an angle
A Fitbit pin needs to move in line with its release path. If the pin feels stuck, release the pressure, straighten the strap, and inspect the latch rather than pushing harder. Pressing diagonally can leave the pin partly engaged or damage the edge of the recess.
Installing over the wrist
Remove the watch and work over a table. You need both hands for alignment, and the case should be supported while the fitting is under pressure. If a component drops, keep the surface clear so you can find it before continuing.
Which tools do I need for sizing and non-quick-release straps
Quick-release levers and slide-in channels usually need no separate fitting tool, but ordinary spring bars and link bracelets do. For a non-quick-release strap, you may need a spring-bar tool. For a steel bracelet, sizing may require a pin pusher and a small hammer, depending on the pin system. These are tools you'll need to source yourself: we sell replacement straps and don't stock watch tools.
Keep tiny pins and collars in a tray or small container while you work, because losing one can prevent the bracelet from going back together correctly. Don't size a bracelet while the watch is on your wrist. Remove the required links first, reconnect the bracelet on the table, and perform the same click, tug, and flush checks used for a strap.
How do I maintain comfort and prevent skin irritation
A secure strap can still be uncomfortable if moisture, detergent, or pressure remains against the skin. Rinse away sweat and soap residue, dry both the wrist and underside of the strap, and leave enough room for normal movement. Wearing a strap too tightly can trap moisture and create rubbing even when the fitting itself is correct.
Material care should match the strap:
- Genuine leather: Keep leather away from prolonged moisture, wipe it gently, and let it dry naturally. Genuine leather options are available for Fitbit, Apple Watch, Garmin QuickFit, and Galaxy Watch fittings, but the connector still needs to match the case.
- Milanese stainless steel: Rinse residue from the mesh when appropriate and dry it thoroughly. Check the clasp and connector for debris before wearing it.
- Soft-touch silicone: Clean away sunscreen, sweat, and detergent residue with a mild rinse, then dry the strap before fitting it again.
- Braided nylon: Brush off surface grime gently and allow the material to dry fully. Damp fabric against the wrist can increase irritation.
Coating wear, sunscreen, denim transfer, and accumulated grime can change a strap's appearance. Skin irritation is usually linked to trapped moisture, residue, or excessive tightness, so correct those conditions before blaming the material.
Choose the collection that matches the fitting you identified: quick-release watch straps for standard spring-bar lugs, Apple Watch straps for the slide-in channel, or Fitbit straps for your Fitbit model. Install the matching strap from Nothing but Bands , then complete the click-and-tug check before wearing it.
Related posts

- October 07, 2026
Discover why comfortable watch straps feel different. Learn the materials, closures, and fit rules that actually matter for Samsung Galaxy...

- October 05, 2026
A practical guide to changing watch straps across Apple, Garmin, Samsung, and Fitbit, covering tools, fitment, daily rotation, and common...

