


In practice, most watch straps come off in anywhere from a few seconds to a few minutes once you identify the fitting; a first attempt at a conventional spring bar can take a little longer. Turn the watch face down and look at how the strap meets the case, because that one look tells you whether you need a lever, a tool, or no tool at all.
If the strap is on your wrist and you want it off now, stop guessing and read the attachment first. The right strap usually pops free quickly when you match the motion to the fitting, and the wrong motion is what scratches cases, bends connectors, and wastes time.
Table of Contents
- Identify Your Strap Fitting in 30 Seconds
- Removing a Quick Release Strap
- Removing a Standard Spring Bar Strap with a Tool
- Removing Proprietary Smartwatch Straps
- Removing NATO and One-Piece Resin Straps
- When the Strap Will Not Come Off
- Measure Lug Width, Clean Up, and Store the Strap
Identify Your Strap Fitting in 30 Seconds
Flip the watch over and inspect the point where the strap enters the case. A small lever on the pin means a quick release band, a plain pin end with a side notch means a standard spring bar that needs a forked tool, a flat tang sliding into a channel with a button beside it means an Apple Watch band, a sliding latch on a wide band end that clips over a pin means Garmin QuickFit, a small flat latch button on the band end usually means a Fitbit Charge, Versa or Sense, and a dedicated release button near the lug points to a Galaxy Watch Ultra connector.
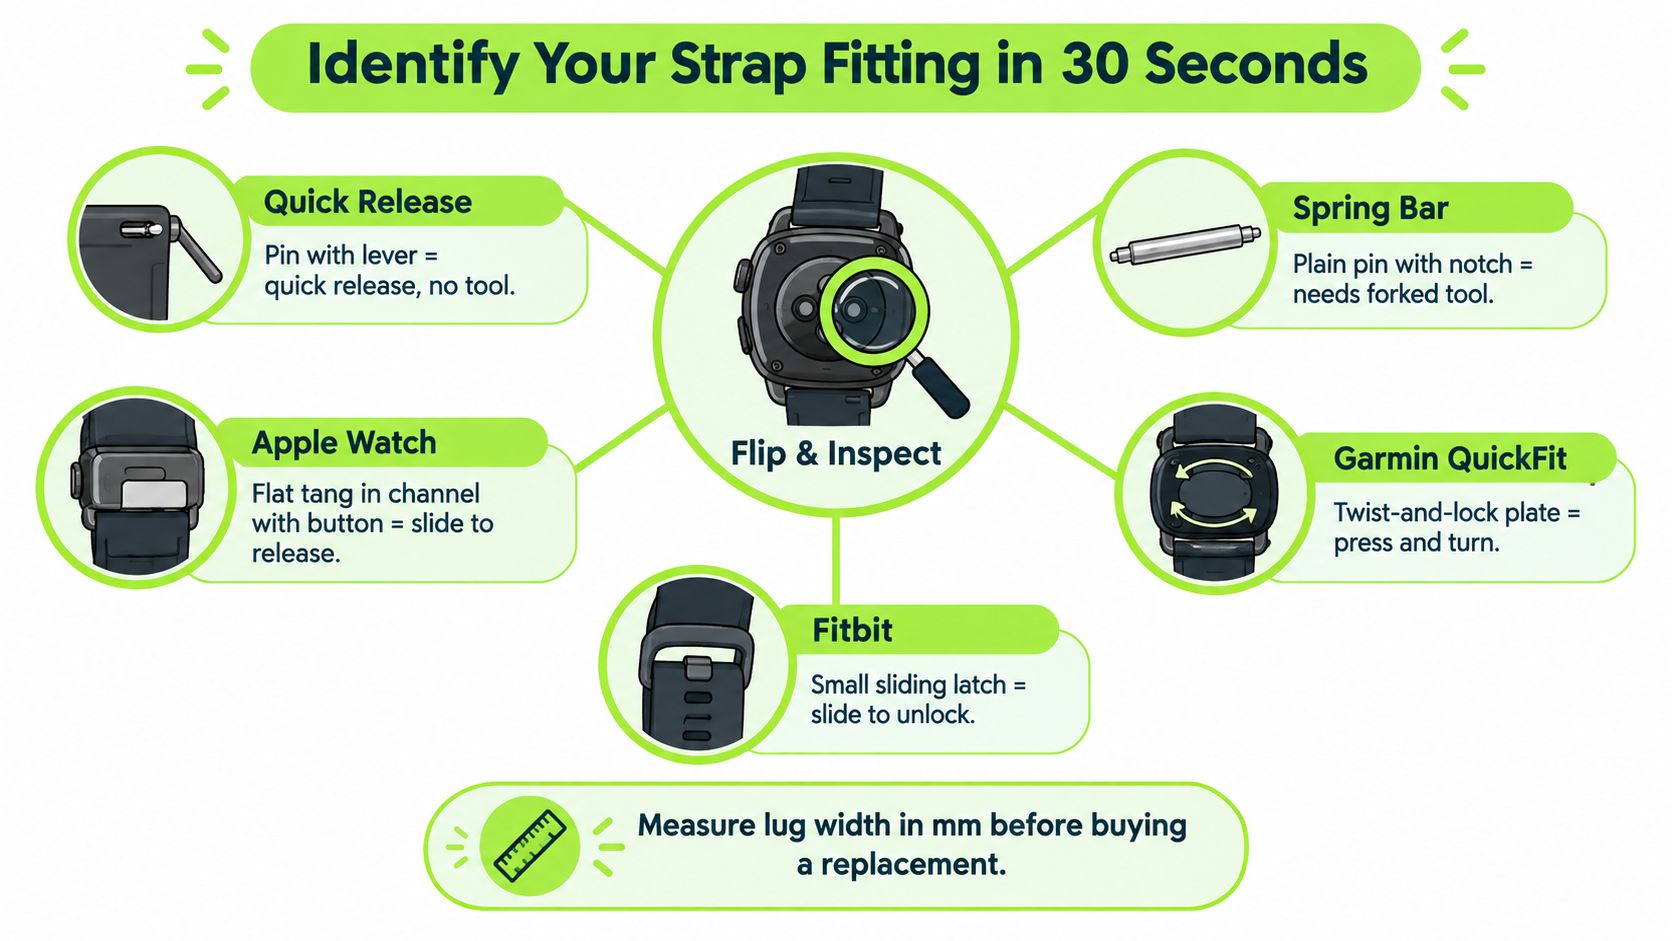
| What you see | Fitting name | Go to section |
|---|---|---|
| Small lever on the pin | Quick release | Removing a Quick Release Strap |
| Plain pin end with a side notch | Standard spring bar | Removing a Standard Spring Bar Strap with a Tool |
| Flat tang in a channel with a button beside it | Apple Watch | Removing Proprietary Smartwatch Straps |
| Sliding latch on the band end, clipped over a pin | Garmin QuickFit | Removing Proprietary Smartwatch Straps |
| Small flat latch button on the band end | Fitbit | Removing Proprietary Smartwatch Straps |
| Dedicated release button near the lug | Galaxy Watch Ultra connector | Removing Proprietary Smartwatch Straps |
That identification step matters because removable straps are the result of a century of spring-bar development, while some smartwatches use dedicated rails and buttons instead of ordinary pins. The basic move is still simple, but the direction changes by fitting, so the watch has to tell you what to do before you touch the tool. Interchangeable straps are normal today, but only if the lug width and connector match the watch correctly. A historical account of the spring bar traces related patents back to Charles Depollier's 1915 filing and Isidor Dintsman's patent published in 1929, and later refinements followed, such as Abraham Coleman's watch strap spring bar patent, published in 1953. That is why the same compress-and-release motion still works on so many traditional watches today.
Once the fitting is identified, the strap usually comes off in seconds to minutes, not by force, but by using the right release motion once.
Removing a Quick Release Strap
A quick release strap comes off by sliding the small lever on the spring bar inward so the pin retracts, then pulling the strap straight out of the lug.
What the lever does
The small tab on the spring bar, just inside the strap end, is the release. Press it with a fingernail or the tip of a thumb, and it draws the spring-loaded pin inward so one side clears the lug hole. Once that side clears, the strap slides free.
Keep the watch face down on a soft surface and move along the rail in a straight line. If the strap does not budge, the pin has not retracted far enough yet. Press the tab again, keep the strap aligned with the channel, and do not twist it against the case.
A quick release removal should feel simple. Once you find the tab, the whole job usually takes seconds. A first attempt may take a little longer, mostly because the lever is small and easy to miss at first. Once you know the strap type, the quick-release watch straps collection is the place to browse.
Practical rule: if the lever moves but the strap stays put, press again and reset your grip instead of pulling harder.
Raymond Taylor on the Véllo — Nylon Loop — Quick Release 22mm: "Got this nylon loop a few weeks ago, and honestly, it’s been great. Super comfortable to wear all day and easy to swap out with the quick release feature. At under $20, definitely feels like a solid deal — way more versatile than my old one! Would buy again without a second thought and telling friends to grab one too."
Removing a Standard Spring Bar Strap with a Tool
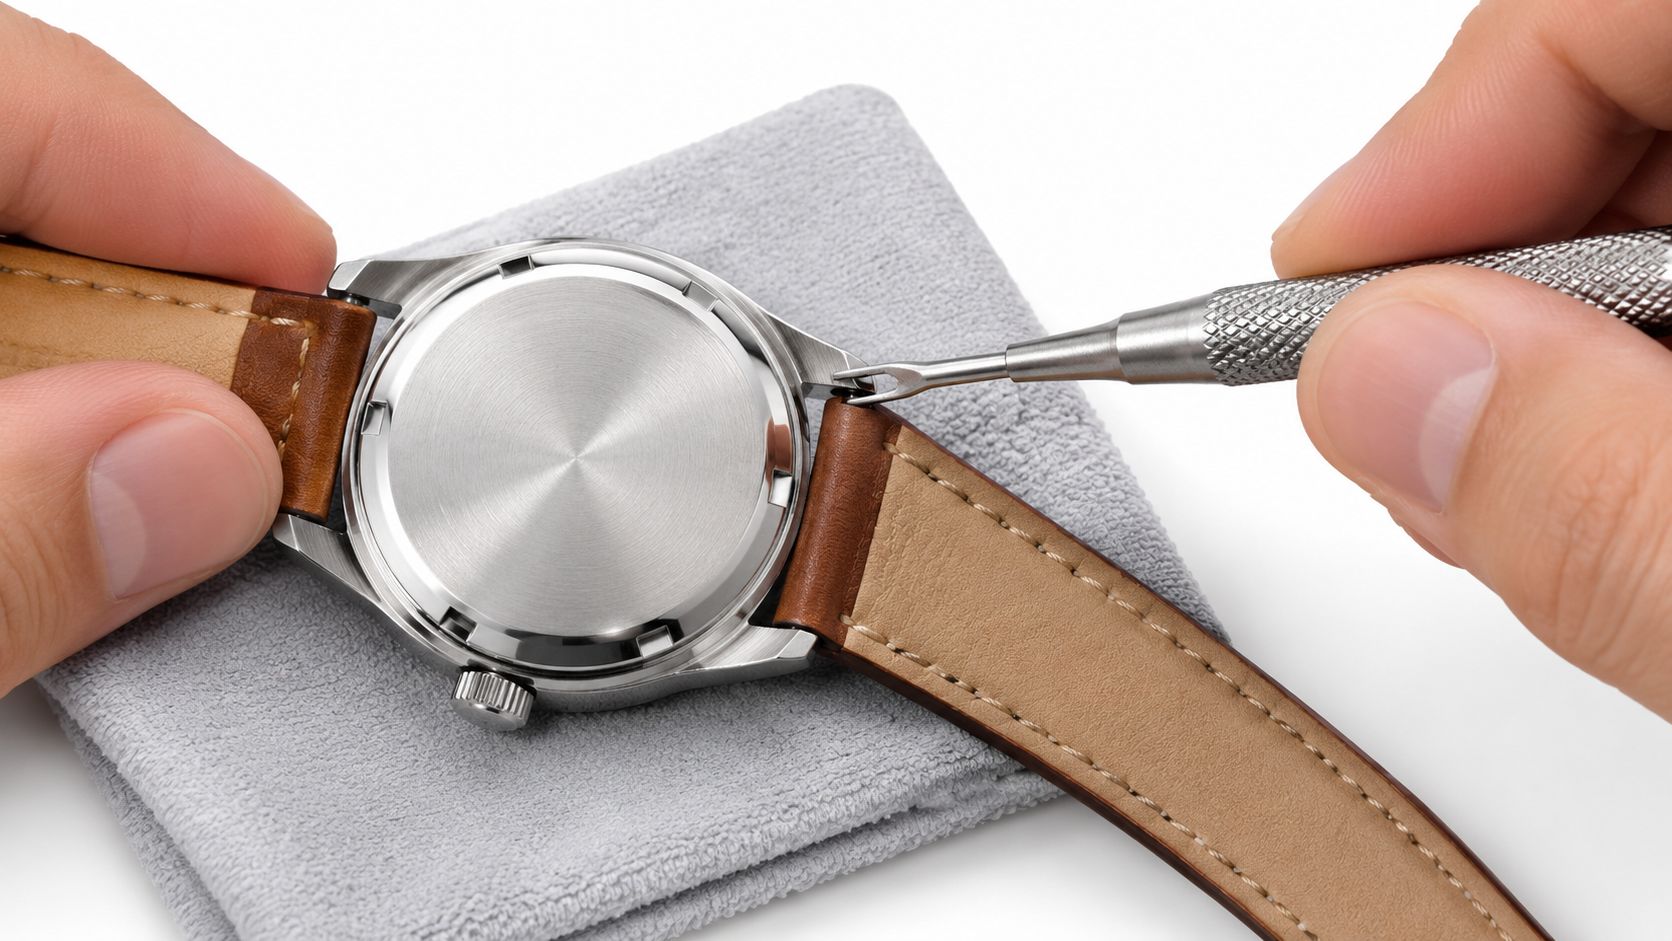
A standard spring bar strap comes off with a forked spring-bar tool, because the bar has to be compressed inward before the strap can clear the lug.
The cleanest way to do it
A cheap double-ended spring-bar tool, forked on one end and pointed on the other, is the right accessory for this job. We don't stock tools, only replacement bands and straps, but if you own one watch tool, make it that forked spring-bar tool. Work over a soft, lint-free cloth, keep the fork square to the bar tip, compress the spring-loaded end inward until it clears the lug hole, then ease the strap down and away at an angle.
Repeat the same motion on the second side. Don't lever the tool against the case, and don't substitute a kitchen knife, screwdriver, or any other makeshift blade. That's how lug scratches happen. If you want a wider repair reference point for this kind of careful work, BenchKey for watch repair is a useful industry resource.
The tool should move the bar, not the case.
A normal spring-bar removal is usually a minute or two for someone who already knows where the notch is, and a first-timer is generally in the several-minute range because the hold needs to stay steady. How to use a spring-bar tool covers the tool itself in detail, so there's no need to re-teach it here.
Removing Proprietary Smartwatch Straps
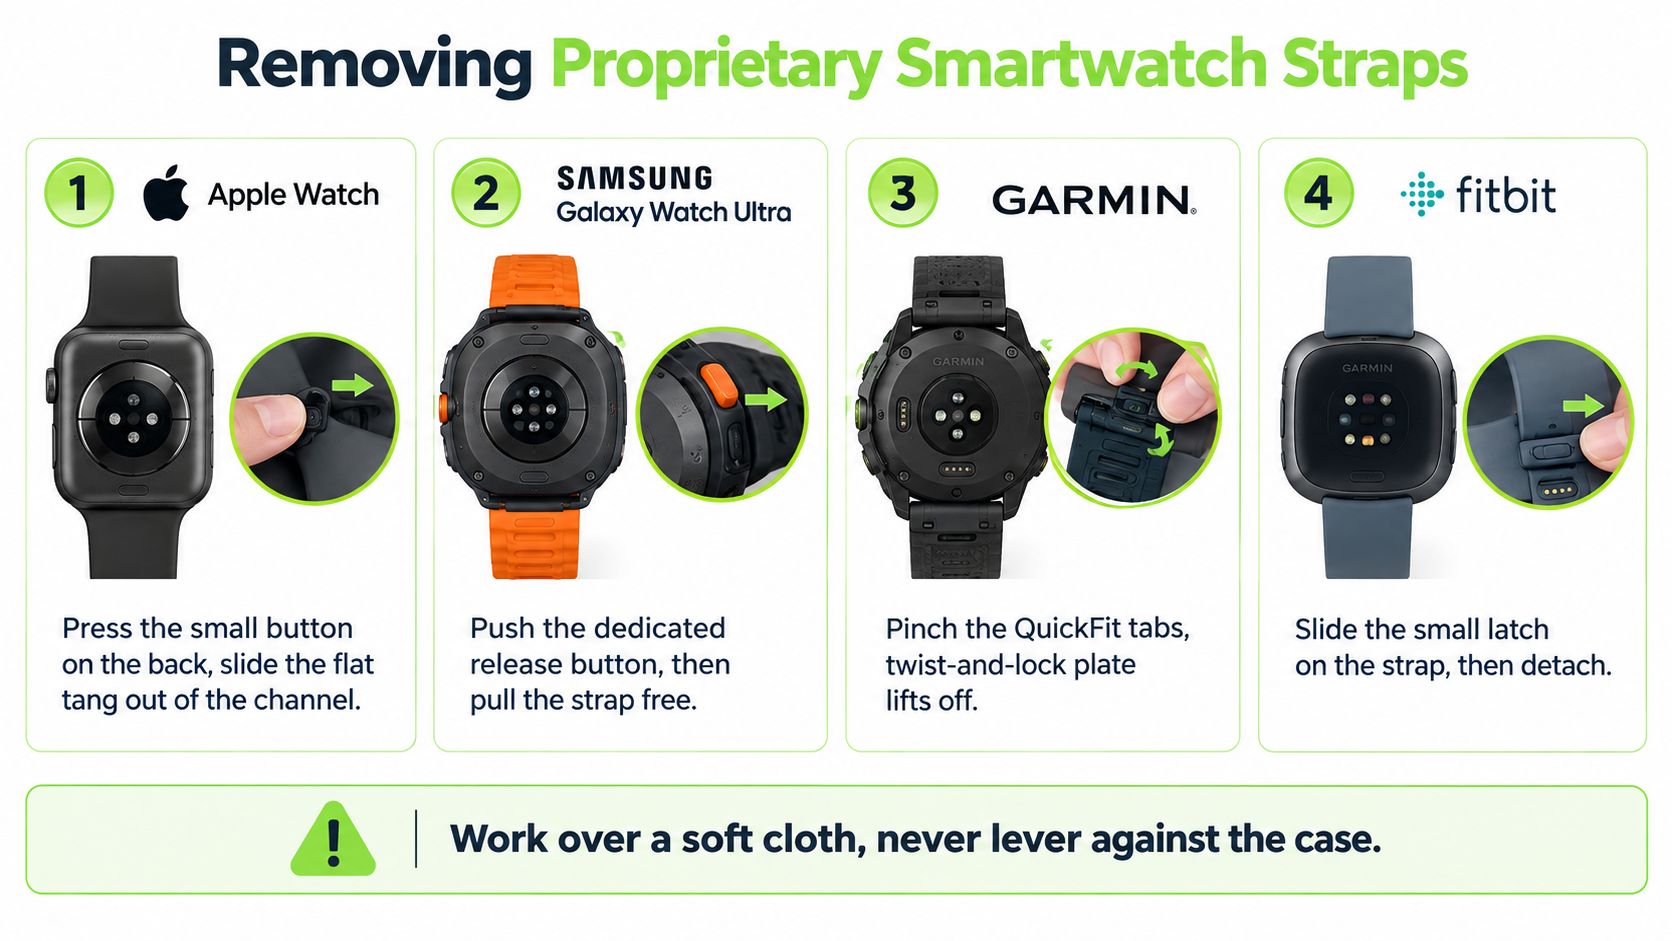
If the strap is not a standard spring bar or quick-release band, stop guessing and identify the fitting first. Apple Watch, Samsung Galaxy Watch, Garmin QuickFit, and Fitbit each use their own release system, and the right removal method depends on that connector, not the brand name on the case.
Apple Watch
Apple Watch bands slide out through the release channel on the back of the case.
Lay the watch face down on a clean, padded, lint-free surface. Press and hold the band-release button on the back of the case, then slide the strap sideways across the channel until it clears the rail. If it stops halfway, release the button, press again, and continue. A partial press leaves the connector locked, so do not force it.
Link Bracelets need one extra move. Press the bracelet's quick-release button first, split the bracelet into its two sections, then slide each section out of the case with the band-release button held. Bands follow the case size family (38/40/41mm, plus the 42mm case on Series 10 and 11, versus the original 42mm and 44/45/46/49mm), so note your case size before you shop. For replacement options, start with Apple Watch straps.
Samsung Galaxy Watch
Samsung Galaxy Watch straps vary, so check the fitting before you pull.
Galaxy Watch4 to Watch7 bands attach with a 20 mm quick-release spring bar. Press the small lever on the spring bar inward, slide the band away from the lug, and repeat on the other side; no tool is normally needed. The Galaxy Watch8 and Watch8 Classic use Samsung's Dynamic Lug system, and the Galaxy Watch Ultra uses its own connector with a dedicated release button, so identify those first rather than treating them like a normal 20 mm Galaxy band. For replacements, go to Samsung Galaxy Watch straps.
Garmin QuickFit
Garmin QuickFit straps release with a sliding latch on the band, not with a standard spring bar.
Turn the watch over, slide the latch on the back of the band end open, and lift the band off the watch pin. No tool and no twisting is needed. QuickFit comes in 20, 22 and 26 mm widths and is not the same thing as an ordinary quick-release band. Many Garmin watches, including the Venu 3 and 3S, the Forerunner 55, 165, 245, 255 and 265, and the Vivoactive range, use ordinary quick-release spring bars instead, so for those follow the quick-release steps above.
Fitbit
Fitbit Charge, Versa and Sense use different release mechanisms, so check which one you have before you pull.
On the Charge 5 and 6, and on the Charge 3 and 4, turn the tracker over, press the small flat button on the band latch with a fingernail, and pull the band gently away from the tracker. On the Versa 3 and 4 and the Sense and Sense 2, turn the watch over, slide the flat button on the band latch toward the band, and pull the band away from the watch. The older Versa, Versa 2 and Versa Lite use a quick-release lever on the band: press the lever inward and gently pull the band away from the watch. Detach each side without bending the connector, and do not assume one model family behaves like another. Once the strap is off, match the replacement to the exact Fitbit fitting instead of choosing a band that only looks close enough.
Removing NATO and One-Piece Resin Straps
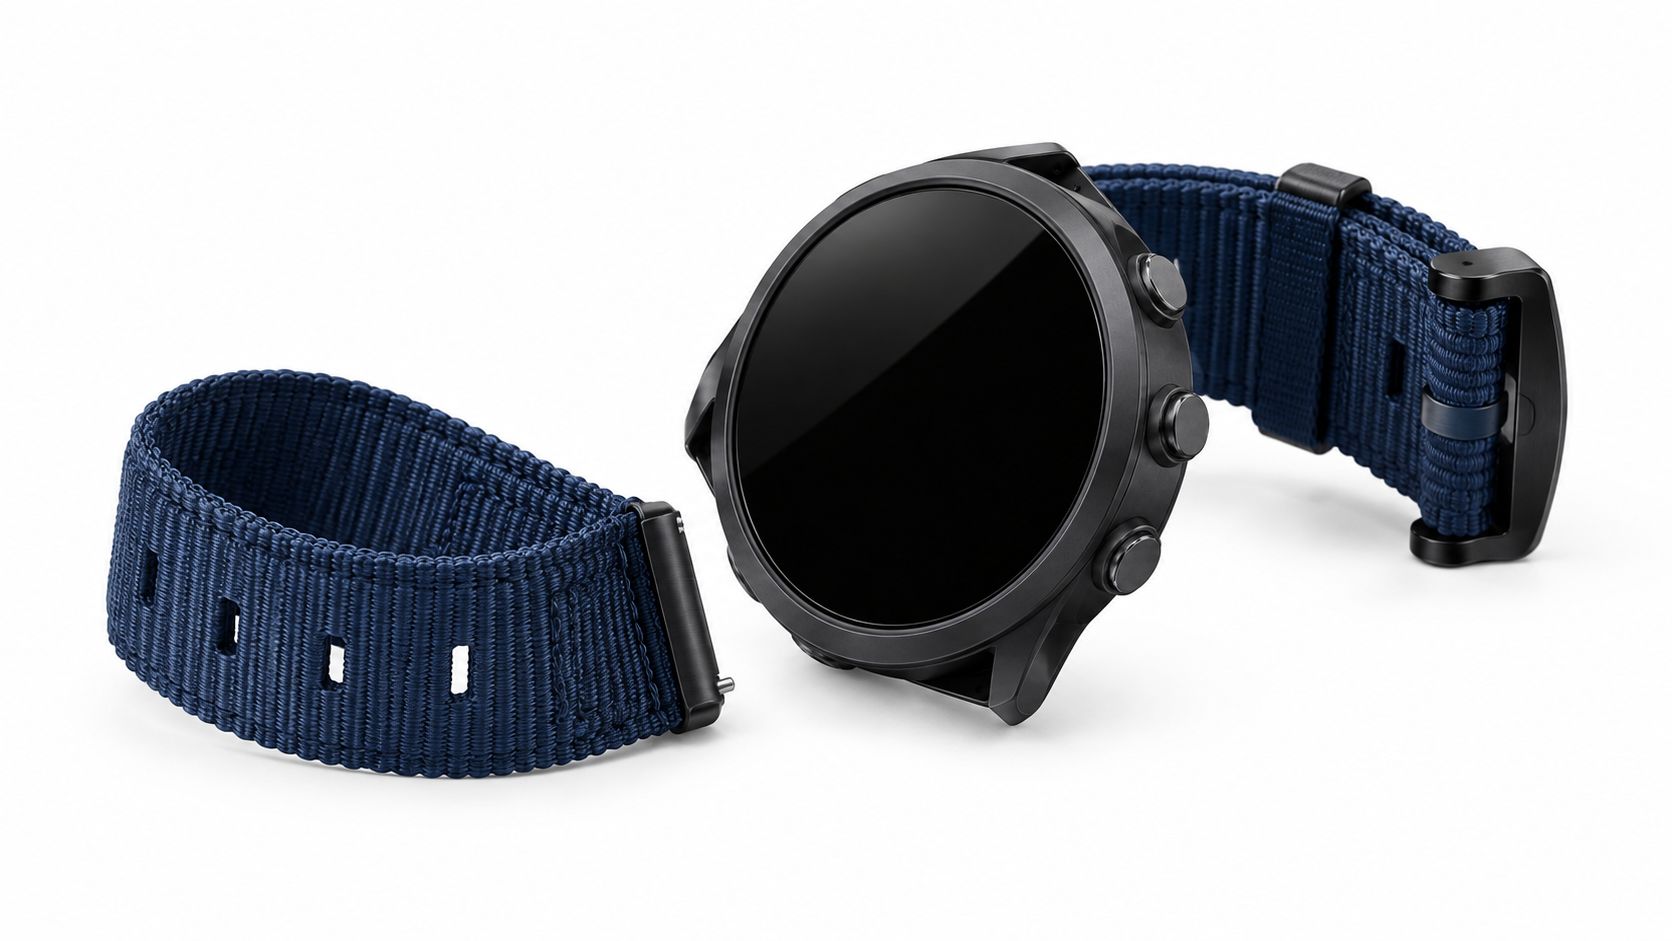
A NATO strap comes off as one piece, and that is what catches first-time owners off guard.
NATO and one-piece pull-through straps
A NATO strap threads underneath both spring bars, which stay in the watch. Unbuckle it, then pull the long end back out under the bars, keeping it flat so the edges do not catch on the lugs. No tool is needed, and you do not split the strap into two halves, so the whole job stays quick once the path is clear.
A one-piece pull-through works the same way in practice: the bars stay put and the strap is simply withdrawn from beneath them.
Resin link straps
A resin link strap comes off like a standard spring-bar strap, but the material flexes, so keep the pressure light.
Use a thin spring-bar tool and avoid metal pushers that can chew the connector edge. Resin can crack if you pry hard, and once it cracks, the strap is finished. If you are dealing with a metal bracelet, leave link removal for the separate bracelet-sizing job and do not treat it like strap removal. For a nylon quick-release option that keeps the same easy-swap feel, the Véllo Nylon Loop, Quick Release 20mm is a straightforward replacement strap, not a bracelet.
When the Strap Will Not Come Off
A strap that won't release is usually dirty, mismatched, or being opened with the wrong motion.
Dried sweat, sunscreen, and soap can sit in the channel and make a connector feel stuck when it's only gummy. A soft brush and a tiny dab of isopropyl alcohol will usually clear that kind of grime if you stay patient. If the band still won't move with gentle pressure, stop. At that point the problem is more likely the wrong width, the wrong model, or a connector that needs a different release action.
Don't force a stuck strap. A knife or screwdriver turns a simple fitment issue into scratched lugs faster than anything else.
Apple's slide-in connector, Garmin's QuickFit hardware, Samsung's different band systems, and ordinary spring bars are not interchangeable just because they all sit at the case edge. A band can also look right and still bind because the width is wrong or the replacement was made for a different watch family. Leather-specific tricks belong elsewhere, link removal belongs elsewhere, and a badly seized strap belongs in a dedicated repair guide, not a force-it-until-it-moves approach. If the band is leather, use the dedicated leather strap guide; if the strap is seized, use the seized-strap guide; if the band has links, use the bracelet-link guide.
Measure Lug Width, Clean Up, and Store the Strap
Measure the inside-to-inside distance between the lugs in whole millimetres before you buy a replacement.
That number sets the fit. A strap in the correct lug width sits squarely; one that is off, even by a little, can shift or fail to seat properly. Clean the watch case and the removed strap with a soft cloth, add a small amount of mild soap only if needed, then let both parts air dry. Keep leather dry and flat, and do not leave moisture in the connector channel.
Keep leather flat, keep metal dry, keep silicone loose rather than folded.
If you are photographing or listing old straps for reuse, clean presentation helps, and scalable workflows for tiny product shots is a useful reference for keeping small items sharp and uncluttered. After cleaning, let the strap dry fully before the next wear. Once the lug width is confirmed, choose the exact millimetre size instead of a close match, because even a 1 mm mismatch affects how the spring bar seats.
Post correlati

- October 15, 2026
Learn what the Apple Watch strap connector is, how the slide-and-lock latch works, which case sizes interchange, and how to...

- October 14, 2026
Find the best replacement watch bands for any smartwatch. Compare fit, material, and durability, with picks for everyday, sport, and...
