


To set up any modern smartwatch, install the manufacturer's companion app on an updated phone, enable Bluetooth, and complete the firmware update before customizing features. Keep the watch and phone close together, charged, and connected to Wi-Fi while the first setup finishes.
The box may contain a polished device, but the watch won't become useful through Bluetooth alone. You need the right app, a compatible phone, the correct permissions, and a few deliberate settings that prevent constant buzzing, missed notifications, poor sensor contact, and an early return to the drawer.
Table of Contents
- What to do before taking the watch out of the box
- The universal pairing path for all smartwatches
- Which companion app does my watch brand require
- Which settings stop the watch from being abandoned in week two
- How should the watch fit for accurate sensor readings
- How do I fix common pairing and notification errors
What to do before taking the watch out of the box
Before setting up a smartwatch, update the phone, connect it to reliable Wi-Fi, charge both devices, and choose the account that will manage the watch. These steps prevent the most avoidable interruptions during pairing and the first software update.
Start with the phone, not the watch. Install the latest available operating-system update, then make sure the phone has Bluetooth enabled and an active Wi-Fi or cellular data connection. Apple requires an eligible iPhone with Bluetooth and Wi-Fi or cellular connectivity for Apple Watch setup, and current Apple requirements specify an iPhone 11 or later for Apple Watch SE 3, Series 9, Ultra 2, and later models listed on its setup page, with the required iOS version varying by model (Apple's pairing and setup requirements).
Charge the watch and phone before beginning. A firmware download can consume time and power, so starting with a nearly empty watch creates a needless failure point. Keep the devices in the same room, preferably on a stable Wi-Fi network, and don't begin setup while the phone is handling a major backup or system update.
Choose the account before pairing
Decide which account you'll use before the app asks you to sign in. That may be an Apple Account, Google Account, Samsung account, Fitbit account, or Garmin Connect account. Using the account you intend to keep long term avoids confusion when health history, backups, contacts, or subscriptions are associated with a different login.
Also check compatibility before opening the pairing screen. Galaxy Watch4 and Watch5 require a compatible Android phone and Galaxy Wearable, and they can't be configured with iOS or as standalone watches (Samsung's Galaxy Watch compatibility guidance). If you plan to protect the device during travel or storage, you can also explore the watch case range before choosing how you'll carry it.
The universal pairing path for all smartwatches
A new watch can appear ready in minutes, yet the setup often stalls at Bluetooth pairing, permissions, or the first update. Across brands, the reliable sequence is consistent: install the official companion app, enable Bluetooth, place the watch in pairing mode, confirm the matching code, approve the requested permissions, and let the initial firmware update complete.
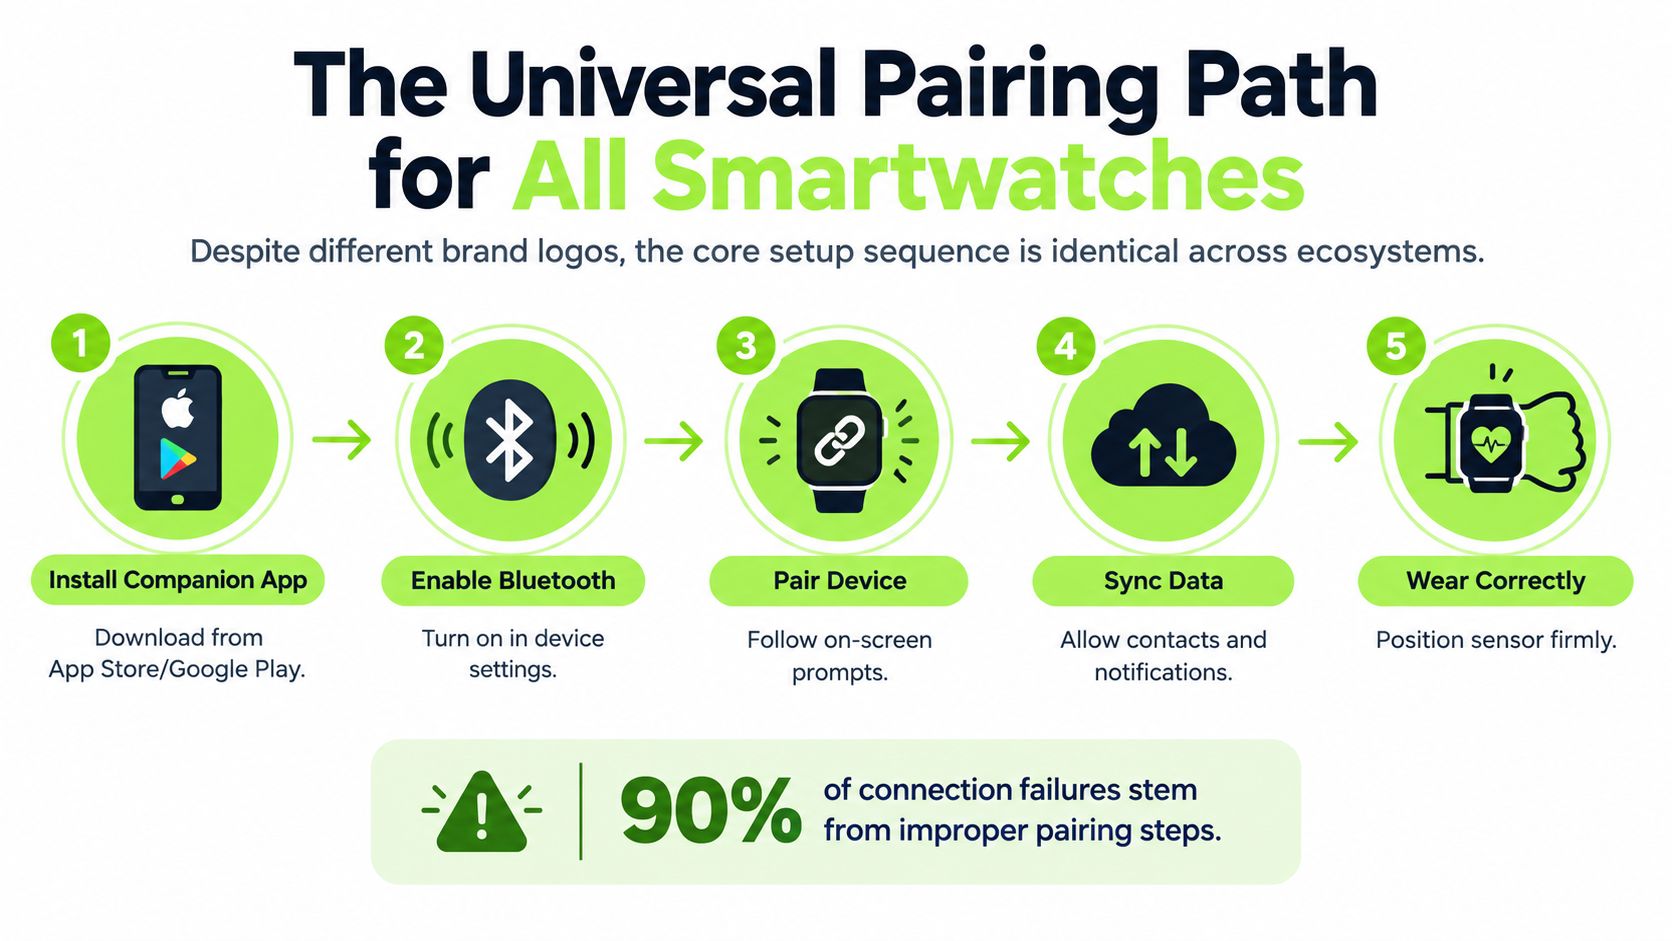
- Install the official app. Use the manufacturer's app rather than a similarly named utility or the phone's generic Bluetooth screen. Google Wear OS uses the Wear OS app or the relevant device companion app, Samsung uses Galaxy Wearable, Garmin uses Garmin Connect, and Apple Watch uses the Watch app on an iPhone.
- Turn on the watch and enter pairing mode. The first boot normally shows setup instructions. For a previously used watch, choose an option such as pairing, connect to phone, or reset before trying again.
- Start pairing inside the app. Do not pair from the phone's native Bluetooth menu first. Garmin requires pairing through Garmin Connect. Open Garmin Devices, choose Add Device, place the watch in pairing mode, and confirm the displayed six-digit code (Garmin's app-based pairing steps).
- Compare the codes before accepting. Google instructs users to confirm that the phone and watch display the same code, and its setup process can take several minutes (Google Wear OS setup guidance). Keep both devices nearby. Samsung describes suitable Bluetooth range as approximately 10 metres, or 32 feet (Samsung's Bluetooth connection guidance).
- Grant permissions, then wait for firmware. Nearby-device access helps the phone find the watch. Location, activity, body-sensor, phone, call-log, and notification permissions support different features. Google Pixel Watch setup requires Bluetooth and location permissions (Google Pixel Watch setup requirements).
The pairing handshake may finish quickly, while the first firmware update takes longer. Leave the watch charging, keep the phone close, and avoid interrupting installation when the progress screen seems inactive. A paused screen during an update does not automatically mean the watch has failed.
Which companion app does my watch brand require
Apple Watch requires the Apple Watch app on an eligible iPhone, Samsung Galaxy Watch requires Galaxy Wearable and its associated components, Fitbit pairs inside the Fitbit app, and Garmin pairs inside Garmin Connect.
Apple Watch
Apple Watch setup starts from the Watch app on an iPhone. Bring the watch close to the iPhone, tap Continue, choose Set Up for Myself, and scan the watch face with the iPhone camera. If the camera pairing process fails, Apple provides manual pairing, where you follow the prompts and enter the displayed information (Apple's Apple Watch pairing instructions).
Apple Watch cellular service is a separate step. Bluetooth pairing doesn't activate LTE, and Apple states that the iPhone and Apple Watch must use the same cellular carrier for cellular configuration (Apple's cellular and compatibility requirements).
Samsung Galaxy Watch
Samsung Galaxy Watch setup uses Galaxy Wearable. Open the app, select the watch when it appears, confirm the displayed code, accept the terms, and complete the prompts. Samsung's Wear OS models need compatible Android hardware, and the correct model must be selected rather than a nearby device with a similar name.
LTE activation comes after the watch-phone connection succeeds. A Bluetooth connection doesn't establish carrier service, so complete the carrier-specific activation separately if the model includes cellular capability.
Fitbit and Garmin
Fitbit devices should be paired inside the Fitbit app, while Garmin devices should be added through Garmin Connect. Garmin's workflow includes opening More, selecting Garmin Devices, choosing Add Device, placing the watch into phone-pairing mode, and confirming the six-digit code in the app.
The practical rule is simple: use the app that owns the watch ecosystem. Pairing from the phone's Bluetooth settings can create a partial connection that looks successful but leaves notifications, synchronization, or account setup incomplete.
Which settings stop the watch from being abandoned in week two
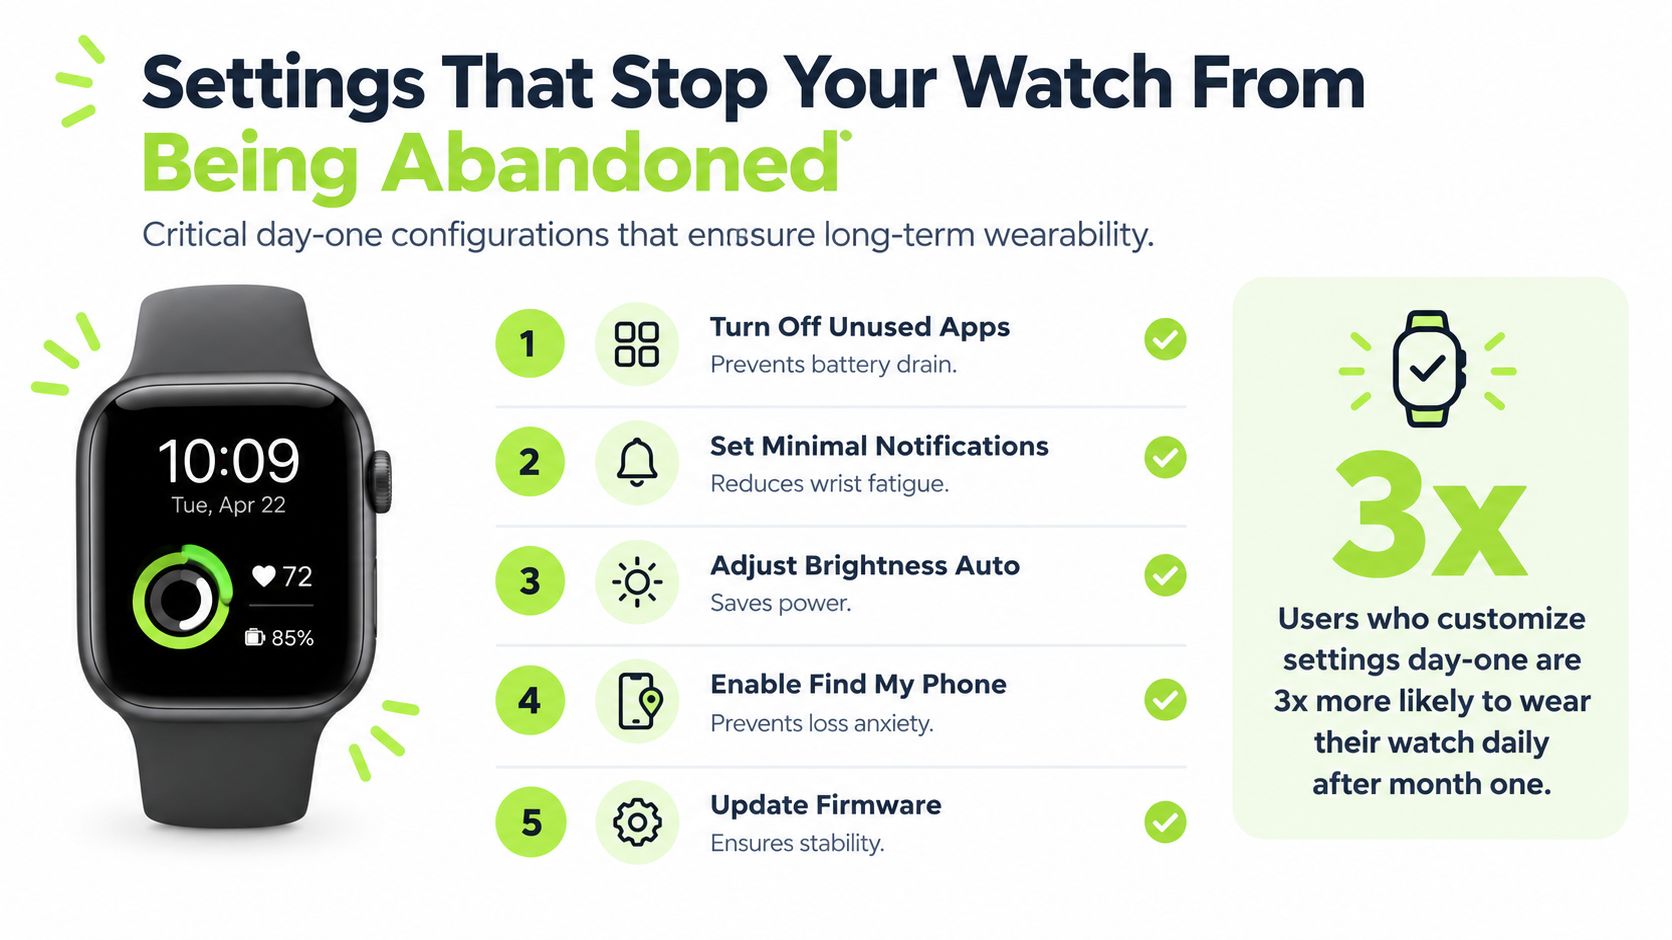
The settings most likely to keep a smartwatch useful are selective notifications, sensible security, a deliberate display choice, automatic activity tracking, and permissions limited to the functions you use.
Start with calls, messages, and calendar notifications. Mirroring every installed app makes the wrist noisy, and the watch becomes easier to ignore. Add other apps one at a time after you know which alerts deserve immediate attention.
Check whether notifications appear while the phone is open, then review Do Not Disturb and bedtime schedules. These controls often explain why a watch seems inconsistent even though pairing succeeded.
Security and battery choices
Turn on wrist detection and a passcode when the watch supports them. Wrist detection can help the device distinguish between being worn and being removed, while a passcode protects personal information and can support payment features. The exact menus vary by brand, so search the companion app for security, wrist detection, or passcode rather than changing unrelated Bluetooth settings.
An always-on display is convenient, but it uses more power than a display that wakes when you raise your wrist or tap the screen. If the watch needs charging too often, disable always-on display before removing useful health or notification features. Adjust brightness automatically where available, and turn off unused apps that send background alerts.
Practical rule: Start with the smallest useful notification set, then add permissions and alerts only when a specific feature needs them.
Enable workout auto-detection if you regularly forget to start sessions manually. Configure sleep tracking only after checking how you'll charge the watch, because a routine that leaves the device off your wrist overnight won't produce useful sleep records. Privacy matters here too. Begin with the minimum access needed for your goals, such as location for GPS workouts, health permissions for metrics, nearby-device access for pairing, and notification access for message mirroring.
A privacy review of wearable policies from 17 major manufacturers found that many policies did not clearly explain sharing with governments, third-party apps, or other organizations, and often lacked transparent breach-notification procedures (Duke's privacy analysis of smartwatches). Read the permission descriptions instead of accepting every request automatically.
For practical battery guidance, see how to extend Apple Watch battery life. The same principle applies across platforms: preserve the functions you use every day, and remove background activity that creates noise without value.
How should the watch fit for accurate sensor readings
A smartwatch's optical heart-rate sensor needs firm, steady skin contact a finger's width above the wrist bone. The watch shouldn't slide during ordinary movement, but the band also shouldn't feel tight enough to cause discomfort or numbness.
Place the sensor flat against the skin and keep the watch in the same position during workouts. A loose fit can interrupt contact when the wrist bends, while sweat, movement, or an overly tight band can make wearing the device unpleasant. Fit affects the quality of contact, but a replacement band isn't a substitute for medical equipment or a guarantee of measurement accuracy.
The stock band may be the wrong size or uncomfortable during exercise. If the strap can't maintain consistent tension, choose a compatible replacement that adjusts securely and is easy to clean. Nothing But Bands carries brand-specific collections for Apple Watch bands, Samsung Galaxy Watch bands, and Fitbit bands. Confirm the case, connector, lug width, and adapter system before ordering, because electronic pairing compatibility and physical band fit are separate questions.
For measuring before you buy, use this watch wrist-size measurement guide.
How do I fix common pairing and notification errors
If the watch never appears in the app, close the app, confirm Bluetooth is enabled, keep both devices close, and put the watch back into pairing mode. Remove any incomplete watch entry from the phone's Bluetooth settings, then restart the process inside the official companion app. Garmin specifically requires app-based pairing rather than direct phone Bluetooth pairing, as explained in this guide to how to sync a Garmin watch.
If the watch pairs and then drops, check compatibility, update the phone and companion app, and review nearby-device, Bluetooth, and location permissions. Restart both devices after confirming the network connection. A Galaxy Watch can fail to connect when Bluetooth permissions aren't allowed, and LTE still requires separate carrier activation after phone pairing.
If notifications never arrive, check notification access inside the companion app and make sure the phone isn't restricting the app in the background. Android battery optimization can stop an app from maintaining notification access, while Do Not Disturb, bedtime schedules, and the phone-unlocked notification setting can suppress alerts on any platform. Test with one message after changing each setting instead of enabling every permission at once.
For older adults or users who need accessibility support, setup shouldn't end when the pairing code is accepted. Larger text, voice assistance, simplified notifications, caregiver involvement, repeated instruction, and a written handoff checklist can make the routine sustainable. A rural older-adult program reported that 91% of participants engaged with smartwatch prompts and that the overall response rate was 77.8% when students provided step-by-step setup and follow-up assistance (Frontiers review and program discussion).
Once your smartwatch is paired and the fit feels secure, the band is the easiest part to improve. Nothing But Bands offers replacement straps for Apple Watch, Samsung Galaxy Watch, Fitbit, Garmin, and Google-compatible models, so visit Nothing But Bands to find a compatible option for everyday wear or workouts.
Post correlati

- October 08, 2026
How to Remove Leather Watch Band. Learn how to remove a leather watch band safely. Step-by-step guide for spring bars,...

- October 07, 2026
Discover why comfortable watch straps feel different. Learn the materials, closures, and fit rules that actually matter for Samsung Galaxy...
