Log in
Reset password
Create an account
Your bag(0)
Your cart is empty
Continue ShoppingSearch

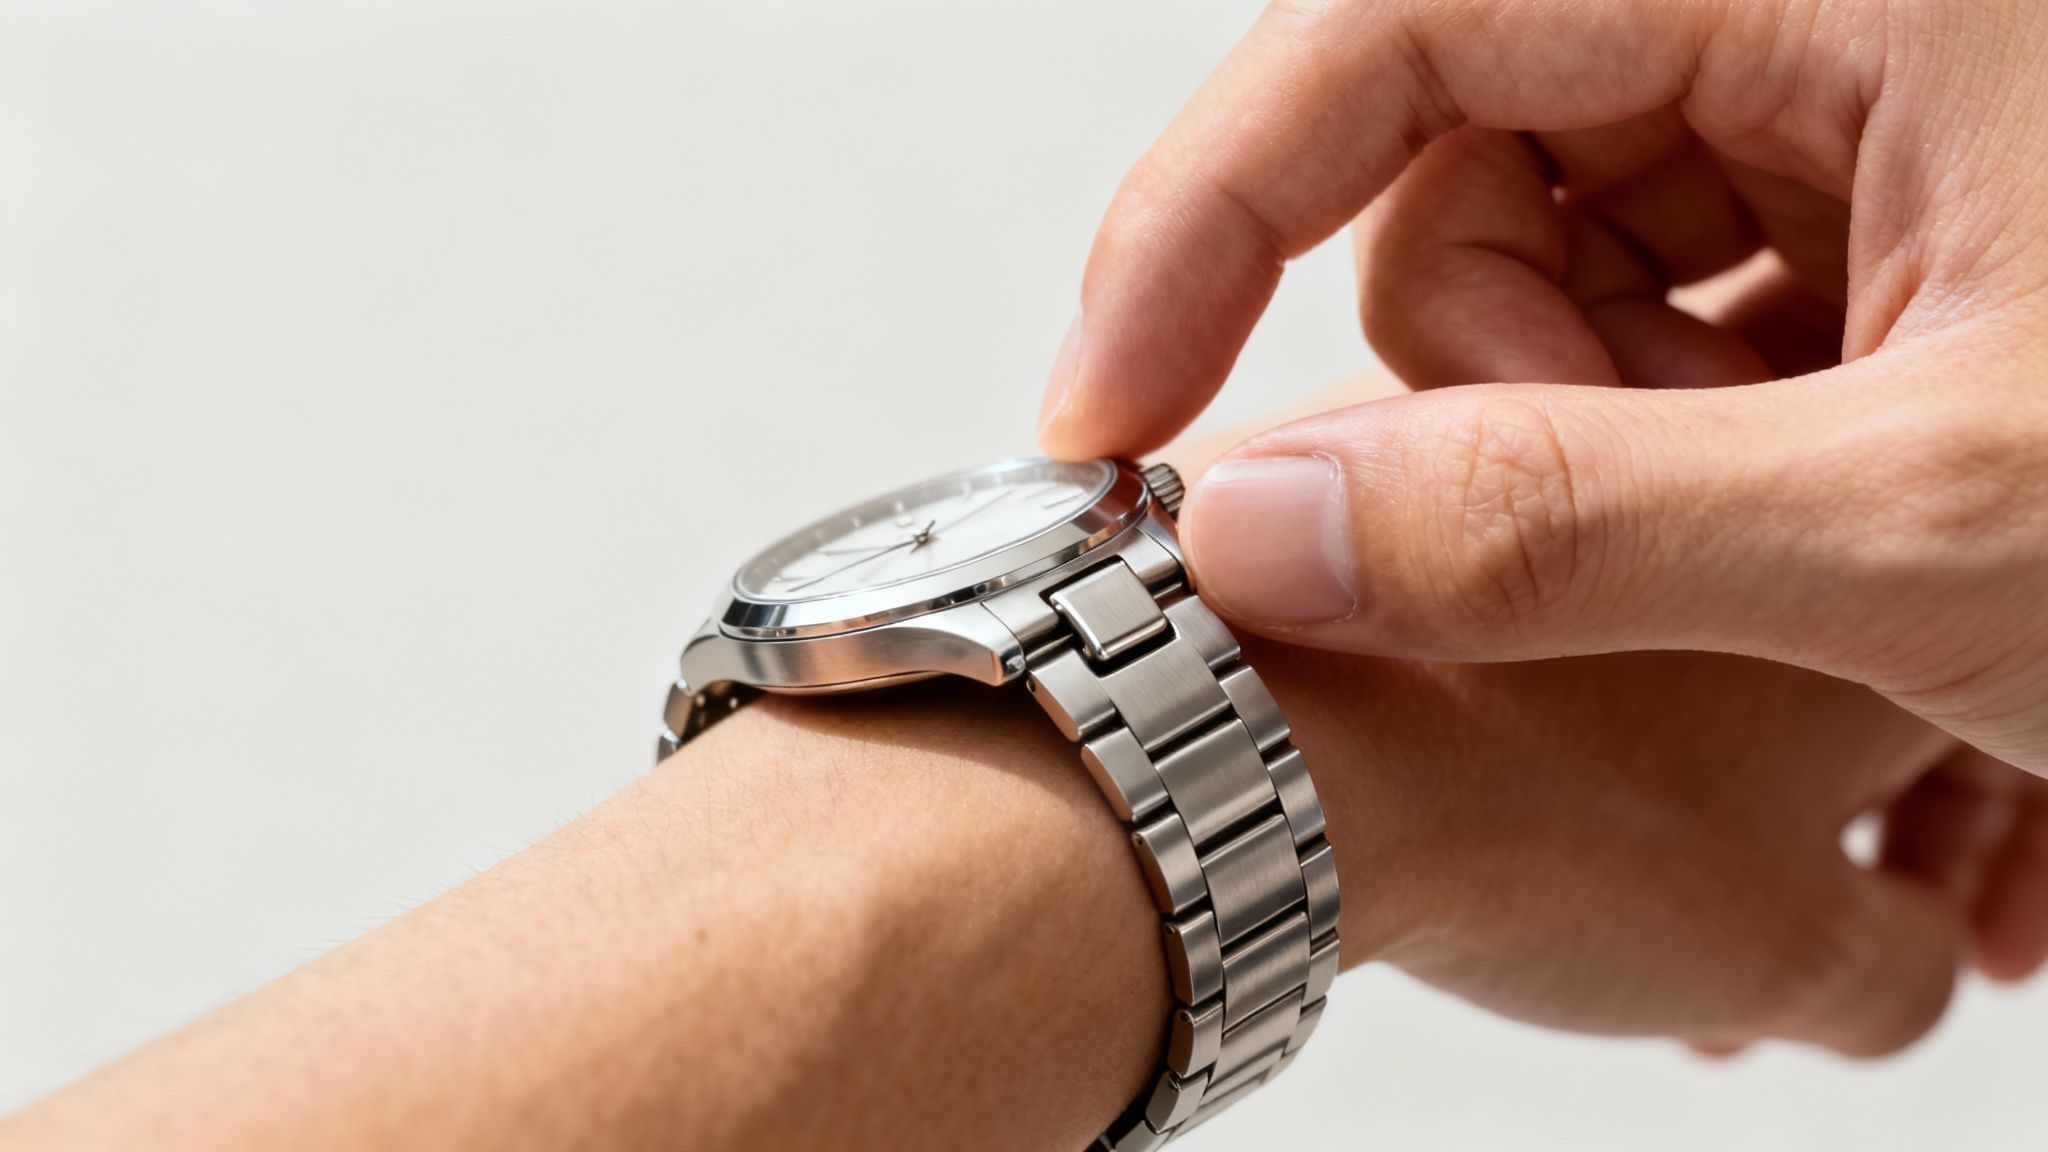
Getting a new watch to fit just right is surprisingly simple once you get the hang of it. The whole trick is to figure out what kind of pins your strap uses, grab the right tool, and make sure you push the pins out in the same direction as the arrows stamped on the links. By removing the same number of links from both sides of the clasp, you'll get a watch that sits perfectly on your wrist.
Achieving the Perfect Fit on Your Metal Watch Strap
There's nothing quite like the feeling of unboxing a new smartwatch, but that excitement can dip if the metal strap is sliding all over your arm. A properly sized bracelet isn't just about comfort—it's about making sure your new tech stays put and looks the part. A strap that's too loose feels awkward and can even interfere with the accuracy of wrist-based sensors on models from Apple, Samsung, or Garmin.
The good news is that most metal watch bracelets are designed for you to adjust at home. You don't need to be a watchmaker or make a special trip to a jeweller. With a bit of patience and the correct technique, you can get a custom fit that feels like it was made just for you. This guide will walk you through the process, step by step, so you can remove those extra links and get a flawless result.
Why a Proper Fit Matters
Taking the time to adjust your watch strap properly pays off in more ways than just looks. It's a small detail that makes a big difference in your daily experience with the watch.
- All-Day Comfort: The watch should feel secure without ever pinching your skin or getting in the way. A good fit means you'll forget you're even wearing it.
- Keeps Your Watch Safe: A loose strap is an accident waiting to happen. It can easily snag on a door frame or desk corner, which could pop the clasp open and send your watch tumbling to the floor.
- Accurate Sensor Readings: If you have a smartwatch, a snug fit is non-negotiable for features like heart rate monitoring. Any gap between the sensors and your skin can throw off the readings.
- A Polished Look: A watch that sits neatly on the wrist just looks better. It’s a sharp, intentional detail, whereas a strap that’s dangling and oversized can make even the most expensive watch look a bit sloppy.
A classic mistake I see all the time is people removing links from just one side of the clasp. This pulls the watch face off-centre, making it sit awkwardly on the wrist. Always aim for symmetry for the best look and feel.
Gathering Your Tools and Setting Up Your Workspace
Before you even think about pushing out a single pin, a bit of prep work will make all the difference. Having the right tools on hand and a decent workspace is the secret to a smooth, scratch-free adjustment. It turns what can be a fiddly, frustrating job into a controlled and satisfying project.
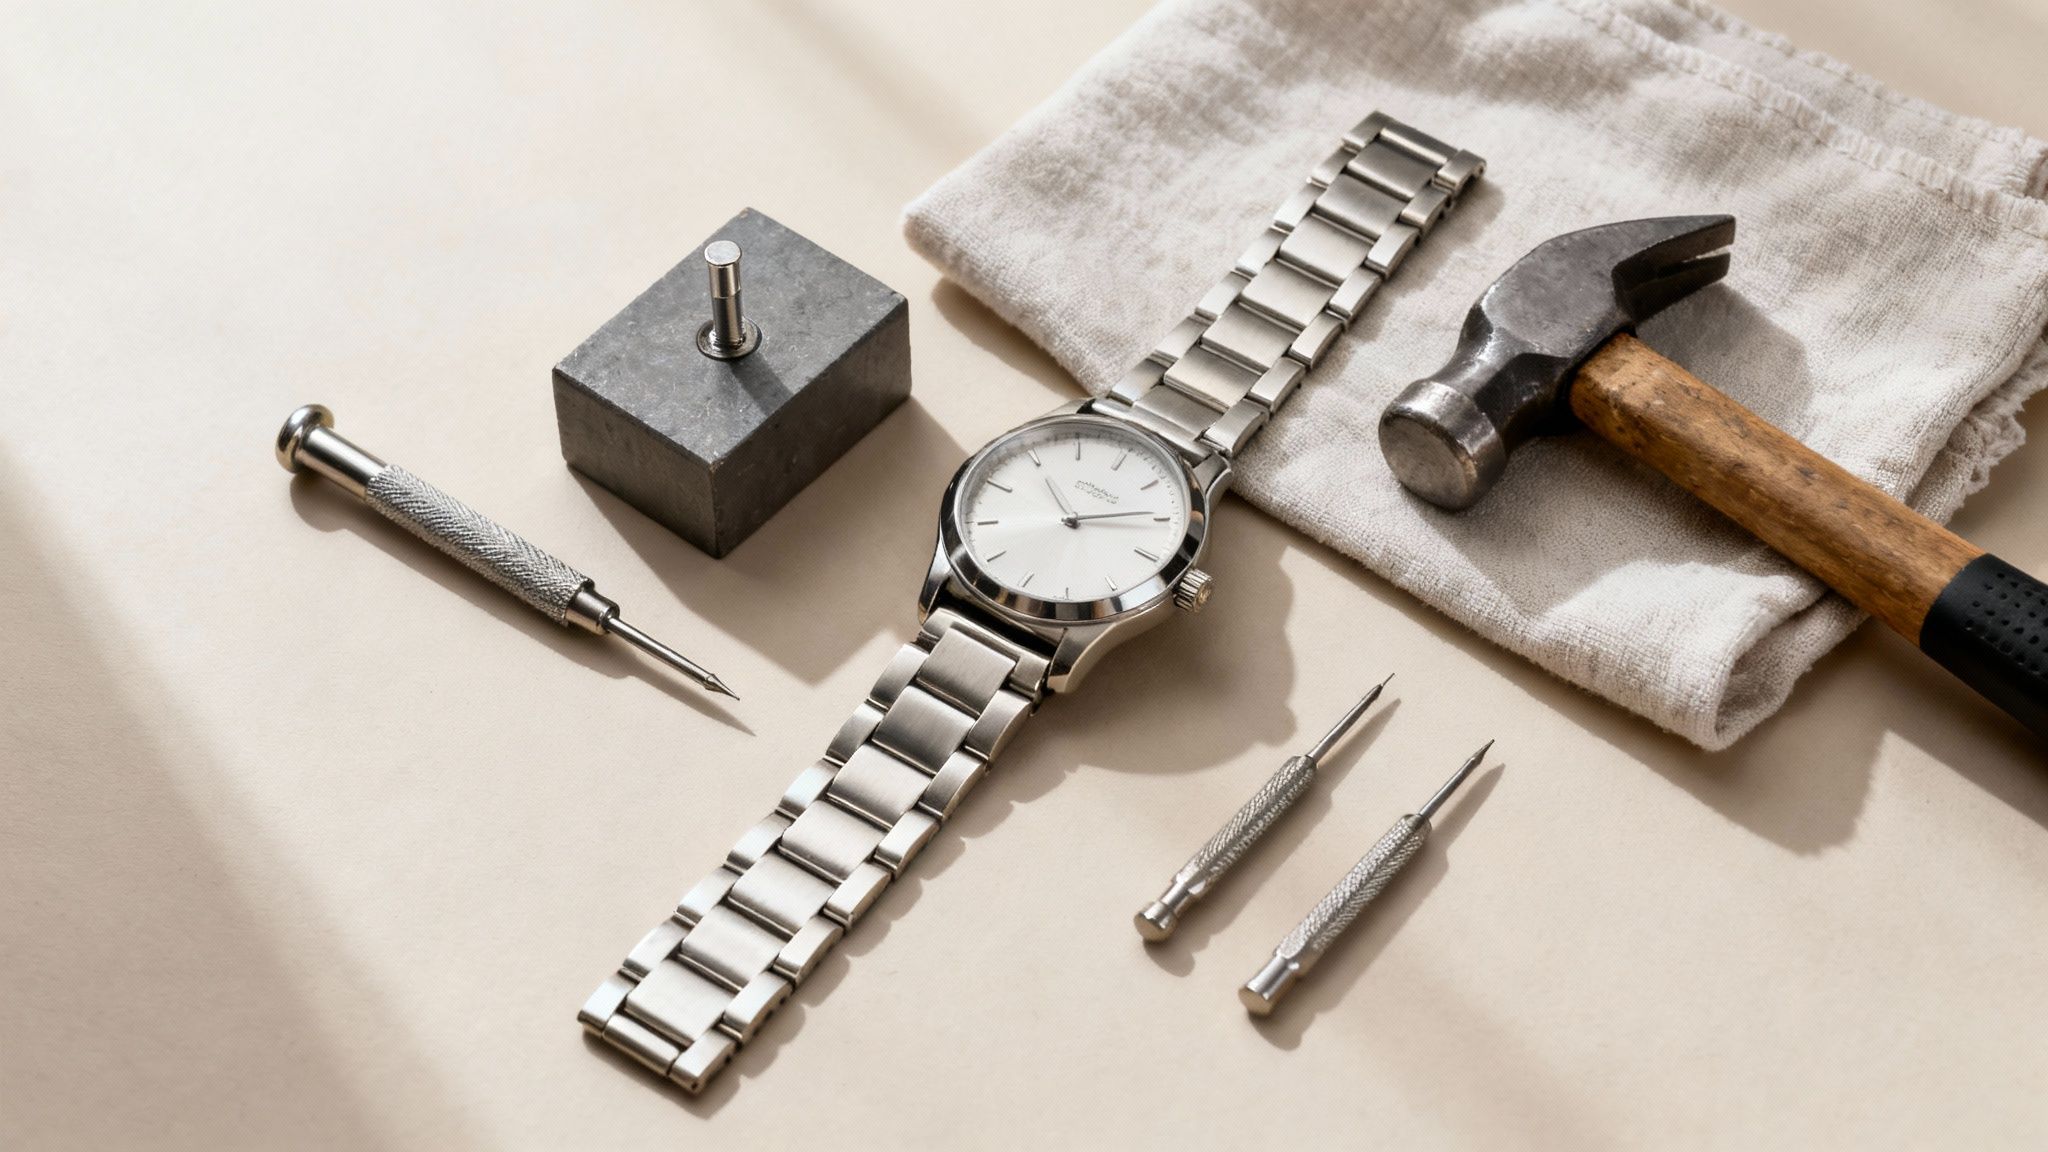
Your best bet is a dedicated watch link removal kit. You can find these easily and cheaply online, and they usually come with everything you'll need. Honestly, trying to bodge it with a thumbtack or a small nail is a recipe for disaster. They can slip, gouge your bracelet, or even end up in your finger.
Your Essential Toolkit
Most kits will give you the core tools needed for common metal watch straps. While the exact contents can vary a little, make sure yours has these essentials.
- Pin Pusher Tool: This is the star of the show. It’s a small, handheld device with a fine metal tip that lets you apply precise, steady pressure to push pins out cleanly without bending them.
- Small Hammer: A lightweight watchmaker’s hammer, often with a plastic head on one side, is perfect for gently tapping pins. It gives you far more control than a hefty household hammer.
- Strap Holding Block: This little plastic block has slots to hold your watch strap securely in place. It frees up your hands and stops the watch from sliding about while you work.
Don't underestimate the value of a proper kit. In the UK, watch repair shops report that around 12% of amateur adjustments they see result in minor damage, usually from using the wrong tools. Spending a few pounds on the right gear is a lot cheaper than paying for a professional repair.
Creating a Safe Workspace
Once you've got your tools, it's time to set up your work area. You don't need a professional workbench—a clean, stable, and well-lit kitchen table or desk will do just fine.
The most important thing is to protect your watch's finish. Lay down a soft, clean microfibre cloth or a felt mat to work on. This simple step creates a padded surface that prevents any accidental scratches to the watch case or bracelet while you're handling it.
Based on industry experience in the UK, the vast majority of successful DIY watch adjustments are done with the right equipment. In fact, nearly 70% of UK watch wearers who resize their own straps use pin pusher tools or similar link removal devices, which are designed to push pins out safely. You can find more detail on safe watch adjustment techniques on rubiconwatches.com.
Finally, grab a small dish or tray to keep all the tiny pins and links in as you remove them. These parts are incredibly easy to lose, and having a designated spot for them will save you a world of pain later. With your tools and workspace organised, you're ready to get started.
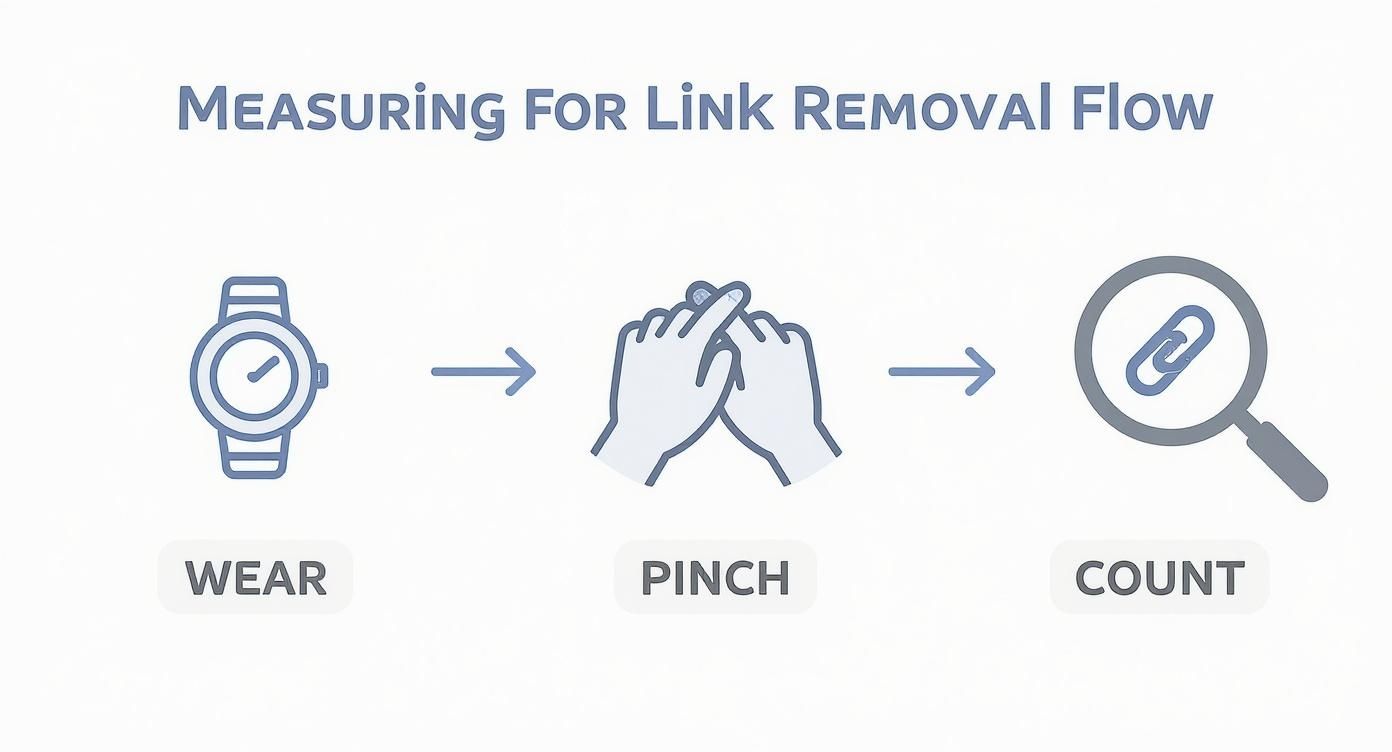
Before you grab any tools and start pushing pins, it’s worth taking a moment to figure out exactly what you’re trying to achieve. Just guessing how many links to remove is a recipe for frustration and a poorly fitting watch. A quick measurement up front saves a lot of hassle later.
The best way to do this is surprisingly simple. Pop the watch on your wrist and fasten the clasp as you normally would. Let it slide down to where it feels most comfortable.
Now, pinch the loose part of the strap together, right under your wrist. You’ll see the extra links bunch up. Just count how many are in that little bundle—that’s your magic number. It tells you roughly how many links need to come out for a nice, snug fit.
Aiming for Balance and Comfort
Here’s a tip that separates a professional-feeling adjustment from an amateur one: balance. For the watch to sit properly and feel comfortable, you want to remove an equal number of links from both sides of the clasp—the part at 6 o'clock and the part at 12 o'clock.
Why is this such a big deal? If you take all the links from one side, it will yank the clasp and the watch face off-centre. Not only does it look a bit strange, but the watch will feel lopsided and constantly try to slide around your wrist. A symmetrical adjustment is the secret to all-day comfort.
- If you need to remove an even number: Let's say it's four links. Easy. Take two from each side.
- If you need to remove an odd number: Needing to remove three links is common. The best approach here is to take two from the 6 o'clock side (the shorter end of the strap) and just one from the 12 o'clock side. This slight difference is barely noticeable and keeps the watch feeling centred.
A Data-Backed Approach
Don't worry, needing to adjust your watch is completely normal. In fact, a 2019 survey of UK watch owners found that around 62% of people with metal bracelets had to remove at least one link for a proper fit. Most standard straps are made to fit wrists up to 20 cm, but the average wrist size is closer to 17.5 cm for men and 16.2 cm for women. This gap is exactly why knowing how to remove links from a watch strap is such a handy skill. For a visual walkthrough, you can explore detailed watch fitting guides on YouTube to see it in action.
My best advice is to always err on the side of caution. If you think you need to remove three links, start by taking out just two. Reassemble it and try it on. It’s far less fiddly to remove one more link than it is to have to put one back in.
This quick measurement gives you a clear target. Once you know how many links to remove and from which side, you can get to work with confidence. For smartwatch wearers, a perfect fit is even more crucial for sensor accuracy. You can find more on this in our guide to Apple Watch size and compatibility.
A Practical Guide to Removing Different Link Types
Alright, with your tools laid out and a clear idea of how many links need to go, it's time to get down to the adjustment itself. This is where we’ll get into the nitty-gritty of how to actually remove links from your watch strap, focusing on the two systems you’ll encounter most often: split pins and screw-in links. Each needs a slightly different touch, but both are perfectly manageable once you know what you’re doing.
The real secret to a clean, scratch-free adjustment is correctly identifying the link type and using slow, steady movements. Trust me, rushing the job is the quickest way to scratch a beautiful bracelet or send a tiny, irreplaceable part flying across the room.
Before you start pushing or twisting, just double-check the number of links you need to remove. The easiest way is to wear the watch, pinch the slack together at the clasp, and then count how many links are in that pinched section.
This simple method just confirms what we covered earlier, making sure you’re aiming for the right number from the get-go.
Handling Standard Split Pins
Split pins, sometimes called cotter pins, are by far the most common system you'll find in metal watch straps. They’re basically friction-fit pins that look solid on one end but have a tiny split on the other, which creates the tension that holds them securely in place. They're a reliable design and surprisingly simple to work with, as long as you follow one golden rule.
Take a close look at the inside of your watch bracelet. You should spot tiny arrows stamped into the removable links. These aren't just for show—they are your instructions, pointing in the exact direction you need to push the pin out. Trying to force a pin out against the arrow will only jam it tighter and could damage the link itself.
Here's how to pop one out:
- Rest your watch strap on its side in the holding block. Make sure the pin you're targeting is lined up directly over one of the holes in the block.
- Take your pin pusher tool and place its tip squarely on the end of the pin.
- Double-check that you’re pushing in the same direction as the arrow indicates.
- Apply firm, steady pressure. Sometimes they're a bit stiff, so a gentle tap from the small hammer can help get it moving.
- Push the pin out just far enough that you can grab the other end with your fingers or a pair of pliers and pull it free. The link will come away easily once the pin is out.
Just repeat that for all the links you’re taking out, and don't forget to remove them evenly from both sides of the clasp for a balanced fit.
Pro Tip: Those directional arrows are everything. Pushing the pin in the direction shown is a standard practice across the UK watch repair industry for a reason—it’s precise and prevents damage. It's the difference between a 5-minute job and a frustrating mess.
Working with Screw-In Links
Some of the more premium or robust watch straps, like those you might find on a high-end Samsung smartwatch, use tiny screws instead of pins. The process is just as straightforward, but your main tool here will be a jeweller's-style screwdriver. The single biggest mistake people make is using a screwdriver tip that’s even slightly too big or too small for the screw head.
An ill-fitting screwdriver is guaranteed to slip and scratch the polished link, or worse, strip the screw head entirely. If that happens, you’ve got a real problem on your hands. Take a moment to test the screwdrivers in your kit to find the one that seats perfectly in the slot before you apply any real force. You’ll often find these secure screw-in systems on sophisticated straps like the Kryos Stainless Link for Samsung watches.
To remove a screw link:
- Lay the strap flat on your soft cloth or mat to prevent any accidental scuffs.
- Seat the correct screwdriver tip firmly into the screw's slot.
- Turn it anti-clockwise with slow, controlled pressure. You’re not muscling it, just steadily breaking the tension.
- Once it’s loose, you can usually unscrew it the rest of the way with your fingertips.
Make sure you put these tiny screws straight into your parts tray. They have a knack for vanishing into thin air. Once you've removed the links you need, you're ready to put your perfectly sized strap back together.
Putting It All Back Together
With the spare links safely set aside, it’s time to reassemble your watch strap. This part is pretty much the reverse of what you just did, but paying close attention here is crucial for a secure fit you can trust every day.
The goal is to reconnect the main part of the bracelet to the clasp. Grab one end of the strap and line it up with the connection point on the clasp. Make sure the pinholes are perfectly aligned before you even think about inserting the pin or screw.
Seriously, don't try to force a misaligned pin. It’s a classic mistake that can easily bend the pin or damage the threads inside the link, resulting in a weak connection that might fail later. A little patience now ensures your strap stays as solid as the day you got it.
Getting the Links Secured Properly
How you put the links back together depends on the type you have. Each system has a simple but vital rule you need to follow.
-
Screw-In Links: This is as easy as it gets. Just pop the screw back into its hole and turn it clockwise with your jeweller’s screwdriver until it feels snug. Resist the urge to crank down on it, as that can strip the threads or the screw head. You just need to tighten it until you feel firm resistance, and no more.
-
Split Pins: Remember the little arrows on the back of the links? When you put the pin back in, you need to go against the direction of the arrow. The fatter, split end of the pin should be the last part to go in—this is what creates the friction fit that locks it securely in place. Push it in as far as you can with your fingers, then use the plastic head of your small hammer or the pin pusher tool to gently tap it the rest of the way.
Pro Tip: Once the pin is in, run your finger along the side of the link. Is it perfectly smooth? If you can feel the end of the pin sticking out, even slightly, it isn’t fully seated. It needs to be completely flush with the surface to prevent it from snagging on clothes or, worse, working its way loose over time.
The Moment of Truth: Checking the Fit
With the strap reconnected, it’s time to try it on. Fasten the clasp and see how it feels. A perfectly sized strap should have just enough room for you to slide one finger between the bracelet and your wrist. It shouldn’t be so loose that it slides up and down your arm, but it definitely shouldn't be tight enough to leave an imprint on your skin.
Give your wrist a good wiggle. The watch head should stay more or less centred and feel comfortable. If it’s still a bit loose, you’ll need to pop out one more link. Too tight? Just add one of the spare links back in using the same process.
Finally, don’t just toss your extra links and pins in a drawer. Keep them in a small plastic bag and store them somewhere safe, like your watch box. You never know when you might need to make an adjustment down the line.
Common Questions About Adjusting Watch Straps
Even after you've successfully resized your strap, you might still have a few questions. That's perfectly normal. Getting the hang of this for the first time can feel a bit tricky, but don't worry—most issues are common and have simple fixes. We've put together some of the most frequent queries we hear to help you out.
Think of resizing a watch strap as a skill. Just like any other, it gets much easier with a little practice. Here are some clear, practical answers to get you past any small bumps in the road.
What if I Remove Too Many Links?
Don't panic! This is probably the most common "oops" moment, and it's incredibly easy to fix. This is exactly why you should always hang on to your spare links and pins. If the watch feels too tight, you just need to pop a link back in.
Simply reverse the steps you followed to take it out. A good rule of thumb is to add the link back to the 6 o'clock side of the strap first. This side is usually shorter, so adding a link here has less of an impact on the overall balance on your wrist. Remember, small, one-link adjustments are the key to dialling in that perfect, custom fit.
One of the biggest mistakes I see is people tossing the spare links. I always tell folks to put them in a tiny, labelled bag and tuck it right inside their watch box. That way, if your wrist size changes or you decide to sell the watch down the line, you've got everything you need.
The Pin Is Stuck and Won't Come Out
This one can be frustrating, but the most important thing to do is stop and take a breath. Do not apply more force. First things first, double- and triple-check that you're pushing the pin in the direction of the tiny arrow on the inside of the link. Trying to push a pin out against the arrow is the number one reason they get jammed.
If you're certain you're pushing in the correct direction and it still won't budge with firm, steady pressure, there might be a tiny bit of debris or a minor factory imperfection in the pinhole. Forcing it from here risks breaking your tool or, even worse, scratching or gouging your watch strap. This is the one time I'd recommend taking it to a professional jeweller. They have specialised tools that can handle stubborn pins without causing any damage.
Why Is Removing Links from Both Sides Important?
Balancing the adjustment is all about comfort and appearance. When you remove a roughly equal number of links from both the 6 o'clock and 12 o'clock sides, you keep the watch head and the clasp perfectly centred on your wrist.
If you pull all the links from just one side, the watch will feel off-balance and constantly try to slide towards the heavier side. It just looks and feels sloppy. Always aim for a symmetrical adjustment. If you need to remove an odd number of links, like three, the standard practice is to take the extra link from the 6 o'clock side. This slight difference is practically unnoticeable and helps maintain that comfortable, centred feel.
For more detailed answers to other common questions, feel free to check out our full FAQ page for smartwatch straps.
Ready to give your smartwatch a style upgrade? At Nothing But Bands , we offer a huge selection of premium straps for Apple Watch, Samsung, Garmin, and more. Find the perfect look for any occasion and enjoy our Buy 1, Get the 2nd 50% Off deal. https://nothingbutbands.com
Article created using Outrank