30-day comfort guarantee · Easy exchanges
In stock · Ready to ship
Build your rotation · 2nd strap −50%
-
Apple Bands -
Fitbit Bands -
Samsung Bands -
Garmin Bands Forerunner® Bands- Forerunner® 970
- Forerunner® 965
- Forerunner® 955
- Forerunner® 945 LTE
- Forerunner® 945
- Forerunner® 935
- Forerunner® 745
- Forerunner® 645
- Forerunner® 570 - 47mm
- Forerunner® 570 - 42mm
- Forerunner® 55
- Forerunner® 265
- Forerunner® 255 Music
- Forerunner® 245 Music
- Forerunner® 245
- Forerunner® 165 Music
- Forerunner® 165
Fēnix® Bands- fēnix® 8 — 51mm
- fēnix® 8 — 47mm
- fēnix® 8 – 51 mm, AMOLED
- fēnix® 8 – 51 mm
- fēnix® 8 – 47 mm, Solar
- fēnix® 8 – 47 mm, AMOLED
- fēnix® 8 Pro – 47 mm, AMOLED
- fēnix® 7X Pro – Solar Edition
- fēnix® 7X Pro – Sapphire Solar Edition
- fēnix® 7X (51 mm)
- fēnix® 7 Pro – Sapphire Solar Edition
- fēnix® 7 (47 mm)
- fēnix® 6X - Sapphire Editions
- fēnix® 6X - Pro
- fēnix® 6 – Standard Edition
- fēnix® 6 - Sapphire Editions
- fēnix® 6 - Pro Solar Edition
- fēnix® 6 - Pro
- fēnix® 5X Plus
- fēnix® 5X
- fēnix® 5
- fēnix® 3 Sapphire
- fēnix® 3 HR
- fēnix® 3
Instinct® Bands- Instinct® 3 – 50 mm, Solar
- Instinct® 3 – 50 mm, AMOLED
- Instinct® 3 – 45 mm, Solar, Tactical Edition
- Instinct® 3 – 45 mm, Solar
- Instinct® 3 – 45 mm, AMOLED
- Instinct® 2X Solar
- Instinct® 2 Solar - Tactical Edition
- Instinct® 2 Solar
- Instinct® Crossover - Standard Edition
- Instinct® Crossover AMOLED
- Instinct® Crossover AMOLED - Tactical Edition
- Instinct® Crossover Solar
- Instinct® Crossover Solar - Tactical Edition
- Instinct® E – 45 mm
- Instinct® Solar – Standard Edition
- Instinct® Solar – Tactical Edition
- Instinct® – Standard Edition
- Instinct® – Tactical Edition
MARQ® Bands- MARQ® Adventurer
- MARQ® Adventurer (Gen 2)
- MARQ® Adventurer (Gen 2) - Damascus Steel Edition
- MARQ® Adventurer Performance Edition
- MARQ® Athlete
- MARQ® Athlete (Gen 2)
- MARQ® Athlete (Gen 2) - Carbon Edition
- MARQ® Athlete Performance Edition
- MARQ® Aviator
- MARQ® Aviator (Gen 2)
- MARQ® Aviator Performance Edition
- MARQ® Captain
- MARQ® Captain (Gen 2)
- MARQ® Captain: American Magic Edition
- MARQ® Commander
- MARQ® Commander (Gen 2) - Carbon Edition
- MARQ® Driver
- MARQ® Driver Performance Edition
- MARQ® Golfer
- MARQ® Golfer (Gen 2)
- MARQ® Golfer (Gen 2) - Carbon Edition
Tactix® Bands- tactix® 8 – 51 mm Solar, Elite
- tactix® 8 – 51 mm Solar
- tactix® 8 – 51 mm AMOLED
- tactix® 8 – 47 mm, AMOLED
- tactix® 7 – Standard Edition
- tactix® 7 – Pro Edition
- tactix® 7 – Pro Ballistics Edition
- tactix® 7 – AMOLED Edition
- tactix® 7
- tactix® Bravo
- tactix® Charlie
- tactix® Delta - Sapphire Edition
- tactix® Delta - Solar Edition
- tactix® Delta - Solar Edition with Ballistics
-
Help
Log in
Reset password
Create an account
Your bag(0)
Your cart is empty
Continue ShoppingSearch
-
Apple Bands
- Apple Watch Series
- Apple Watch Ultra
- Apple Watch SE
-
- Fitbit Bands
-
Samsung Bands
- Galaxy Watch 8 / 8 Classic
- Galaxy Watch Ultra
- Galaxy Watch 7 / 7 Pro
- Galaxy Watch 6 / 6 Classic
- Galaxy Watch 5 / 5 Pro
- Galaxy Watch 4 / 4 Classic
- Galaxy Watch 3 Bands
- Galaxy Watch (2018) Bands
- Galaxy Watch Active Bands
- Gear Watch Bands
-
-
Garmin Bands
- Approach® Bands
- D2™ Bands
- Descent™ Bands
- Enduro™ Bands
- Epix™ Bands
-
Forerunner® Bands
- Forerunner® 970
- Forerunner® 965
- Forerunner® 955
- Forerunner® 945 LTE
- Forerunner® 945
- Forerunner® 935
- Forerunner® 745
- Forerunner® 645
- Forerunner® 570 - 47mm
- Forerunner® 570 - 42mm
- Forerunner® 55
- Forerunner® 265
- Forerunner® 255 Music
- Forerunner® 245 Music
- Forerunner® 245
- Forerunner® 165 Music
- Forerunner® 165
- Foretrex® Bands
-
Fēnix® Bands
- fēnix® 8 — 51mm
- fēnix® 8 — 47mm
- fēnix® 8 – 51 mm, AMOLED
- fēnix® 8 – 51 mm
- fēnix® 8 – 47 mm, Solar
- fēnix® 8 – 47 mm, AMOLED
- fēnix® 8 Pro – 47 mm, AMOLED
- fēnix® 7X Pro – Solar Edition
- fēnix® 7X Pro – Sapphire Solar Edition
- fēnix® 7X (51 mm)
- fēnix® 7 Pro – Sapphire Solar Edition
- fēnix® 7 (47 mm)
- fēnix® 6X - Sapphire Editions
- fēnix® 6X - Pro
- fēnix® 6 – Standard Edition
- fēnix® 6 - Sapphire Editions
- fēnix® 6 - Pro Solar Edition
- fēnix® 6 - Pro
- fēnix® 5X Plus
- fēnix® 5X
- fēnix® 5
- fēnix® 3 Sapphire
- fēnix® 3 HR
- fēnix® 3
-
Instinct® Bands
- Instinct® 3 – 50 mm, Solar
- Instinct® 3 – 50 mm, AMOLED
- Instinct® 3 – 45 mm, Solar, Tactical Edition
- Instinct® 3 – 45 mm, Solar
- Instinct® 3 – 45 mm, AMOLED
- Instinct® 2X Solar
- Instinct® 2 Solar - Tactical Edition
- Instinct® 2 Solar
- Instinct® Crossover - Standard Edition
- Instinct® Crossover AMOLED
- Instinct® Crossover AMOLED - Tactical Edition
- Instinct® Crossover Solar
- Instinct® Crossover Solar - Tactical Edition
- Instinct® E – 45 mm
- Instinct® Solar – Standard Edition
- Instinct® Solar – Tactical Edition
- Instinct® – Standard Edition
- Instinct® – Tactical Edition
-
MARQ® Bands
- MARQ® Adventurer
- MARQ® Adventurer (Gen 2)
- MARQ® Adventurer (Gen 2) - Damascus Steel Edition
- MARQ® Adventurer Performance Edition
- MARQ® Athlete
- MARQ® Athlete (Gen 2)
- MARQ® Athlete (Gen 2) - Carbon Edition
- MARQ® Athlete Performance Edition
- MARQ® Aviator
- MARQ® Aviator (Gen 2)
- MARQ® Aviator Performance Edition
- MARQ® Captain
- MARQ® Captain (Gen 2)
- MARQ® Captain: American Magic Edition
- MARQ® Commander
- MARQ® Commander (Gen 2) - Carbon Edition
- MARQ® Driver
- MARQ® Driver Performance Edition
- MARQ® Golfer
- MARQ® Golfer (Gen 2)
- MARQ® Golfer (Gen 2) - Carbon Edition
- Quatix® Bands
-
Tactix® Bands
- tactix® 8 – 51 mm Solar, Elite
- tactix® 8 – 51 mm Solar
- tactix® 8 – 51 mm AMOLED
- tactix® 8 – 47 mm, AMOLED
- tactix® 7 – Standard Edition
- tactix® 7 – Pro Edition
- tactix® 7 – Pro Ballistics Edition
- tactix® 7 – AMOLED Edition
- tactix® 7
- tactix® Bravo
- tactix® Charlie
- tactix® Delta - Sapphire Edition
- tactix® Delta - Solar Edition
- tactix® Delta - Solar Edition with Ballistics
- Venu® Bands
- Vívoactive® Bands
- Vívomove® Bands
- Other Garmin Bands
-
- Help
$
CAD / EN

How to change apple watch band: A simple, perfect-fit guide
- January 16, 2026
- |
- Eugene
One of the best things about the Apple Watch is how easy it is to change its look. You don't need any special tools, and the whole process takes less than a minute once you get the hang of it. It all comes down to two tiny release buttons on the back of the watch.
Your Quick Guide to Swapping Apple Watch Bands
Knowing how to switch out your Apple Watch band is a game-changer. It lets you instantly match your watch to your outfit, your activity, or just your mood. Going from a gym-ready Sport Band to a classier leather strap for a night out? Apple's design makes it incredibly straightforward.
This isn't just about style, though—it's also about practicality. You wouldn't wear your fancy Milanese Loop for a muddy trail run, right? Swapping it for a rugged silicone or nylon band protects your nicer straps from wear, tear, and sweat. This simple skill makes your watch a truly versatile accessory for every part of your life.
Here's the crucial bit: Always listen for the 'click' when you slide a new band in. If you don't hear and feel it lock into place, it's probably not secure. You definitely don't want your watch taking a tumble because the band wasn't attached properly.
First, Check Your Sizing
Before you get started, double-check that your band and watch are compatible. Apple keeps things simple by grouping the sizes. Essentially, there are two main categories:
- Smaller cases: Bands designed for the 38mm, 40mm, and 41mm models are all interchangeable.
- Larger cases: Bands made for the 42mm, 44mm, 45mm, and 49mm (Ultra) models will fit each other.
Getting this right from the start is key to making sure your new band connects securely and looks seamless.
Apple Watch Band Compatibility at a Glance
Not sure which size you need? This table breaks it down. Just find your watch's case size to see which family of bands will fit.
| Small Case Models (38mm, 40mm, 41mm) | Large Case Models (42mm, 44mm, 45mm, 49mm) |
|---|---|
| Apple Watch Series 1, 2, 3 (38mm) | Apple Watch Series 1, 2, 3 (42mm) |
| Apple Watch Series 4, 5, 6, SE (40mm) | Apple Watch Series 4, 5, 6, SE (44mm) |
| Apple Watch Series 7, 8, 9 (41mm) | Apple Watch Series 7, 8, 9 (45mm) |
| Apple Watch Ultra & Ultra 2 (49mm) |
So, if you have a 45mm Series 9, you can use any band designed for the 42mm, 44mm, or 49mm models. Likewise, a band from a 38mm Series 3 will pop right onto a new 41mm Series 9.
Mastering the Basics for Standard Watch Bands
Swapping out a standard Apple Watch band, like the silicone Sport Band or a woven Sport Loop, is brilliantly simple. Apple designed the whole process to take just a few seconds, and it all comes down to two small, oval-shaped release buttons on the back of your watch. You'll find them right where the band connects to the watch case.
First things first, protect your screen. Always place your watch face-down on something soft—a microfibre cloth is perfect—to avoid any accidental scratches. With that sorted, you can focus on the release buttons.
Releasing the Old Band
Go ahead and press one of the release buttons firmly with your thumbnail or the pad of your finger. While you hold it down, the band is unlocked. Now, just slide that part of the strap sideways, straight out of the channel it sits in.
If it feels a bit stuck, resist the urge to yank it. More often than not, it's just a matter of making sure the button is pressed all the way down. A gentle wiggle while you slide usually does the trick. Repeat the exact same thing for the other side, and you're done. It’s a simple press-and-slide motion that you'll master in no time.
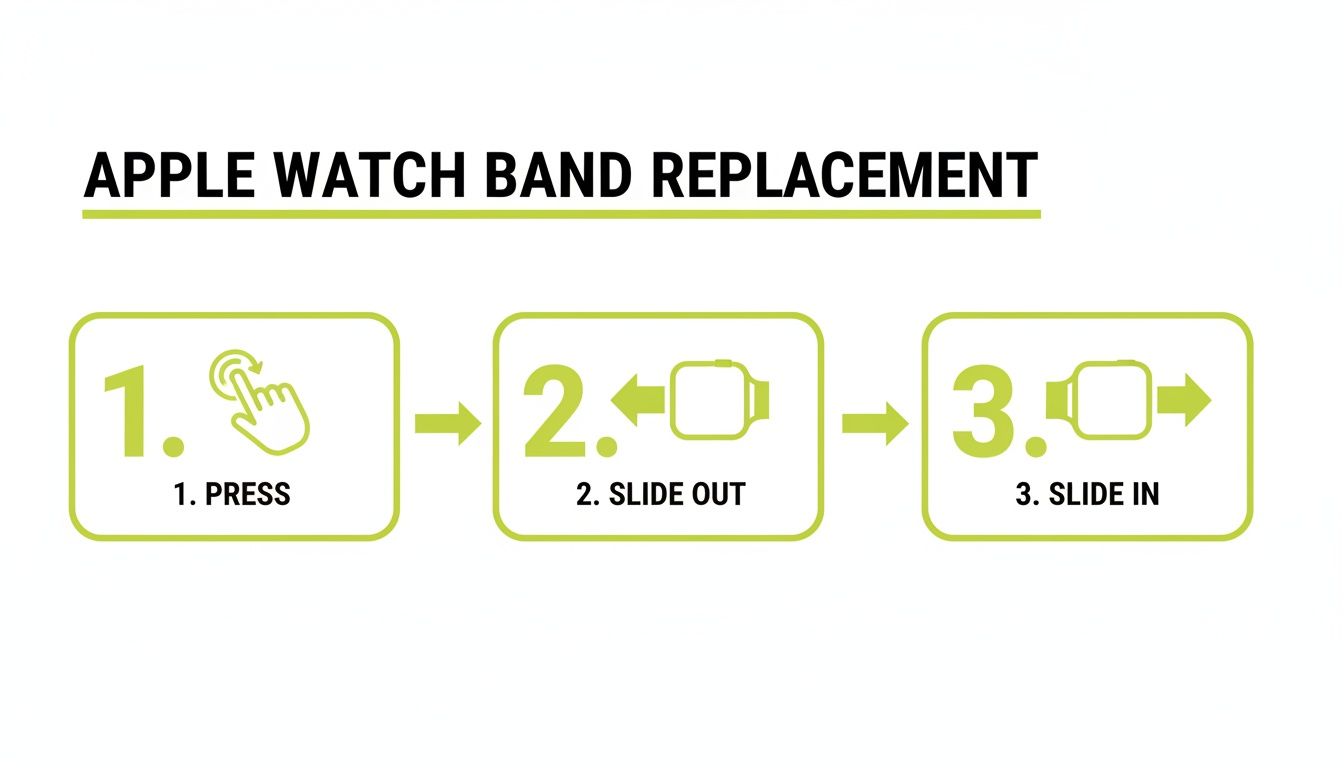
This quick visual shows just how simple it is: press the button, slide the old band out, and slide the new one in.
Securing the New Band
Putting the new band on is just as easy, but there's one critical step. Take one half of your new strap and guide it into the open slot. You need to slide it in until you hear and feel a satisfying 'click'.
That click is your confirmation that the locking mechanism is properly engaged. If you don't hear it, the band isn't secure, which puts your watch at risk of falling off.
Once you get that click, give the band a little tug to make sure it's not going anywhere. It should feel completely solid. After you've done this for both sides, you're all set. Of course, a secure band starts with the right size from the get-go. If you're unsure, it's worth learning how to measure your watch band size for a perfect fit.
Adjusting and Changing Link Style Bands
Link bracelets and Milanese Loops give the Apple Watch that classic, high-end jewellery feel, but their design can look a bit daunting at first glance. Don't worry, changing them is much easier than you might think. Attaching them to the watch case is exactly the same as any other band—press the release button, slide the connector in, and wait for that satisfying click.
The real difference comes down to getting the fit just right.
Take the Milanese Loop, for instance. It's brilliantly simple. It features a strong magnetic clasp that glides along the mesh, letting you find your perfect size without needing any tools. Just feed the magnetic end through the lug to form the loop, slip it over your wrist, and pull it snug. That magnet is seriously strong and keeps the band securely in place all day.
Sizing a Metal Link Bracelet
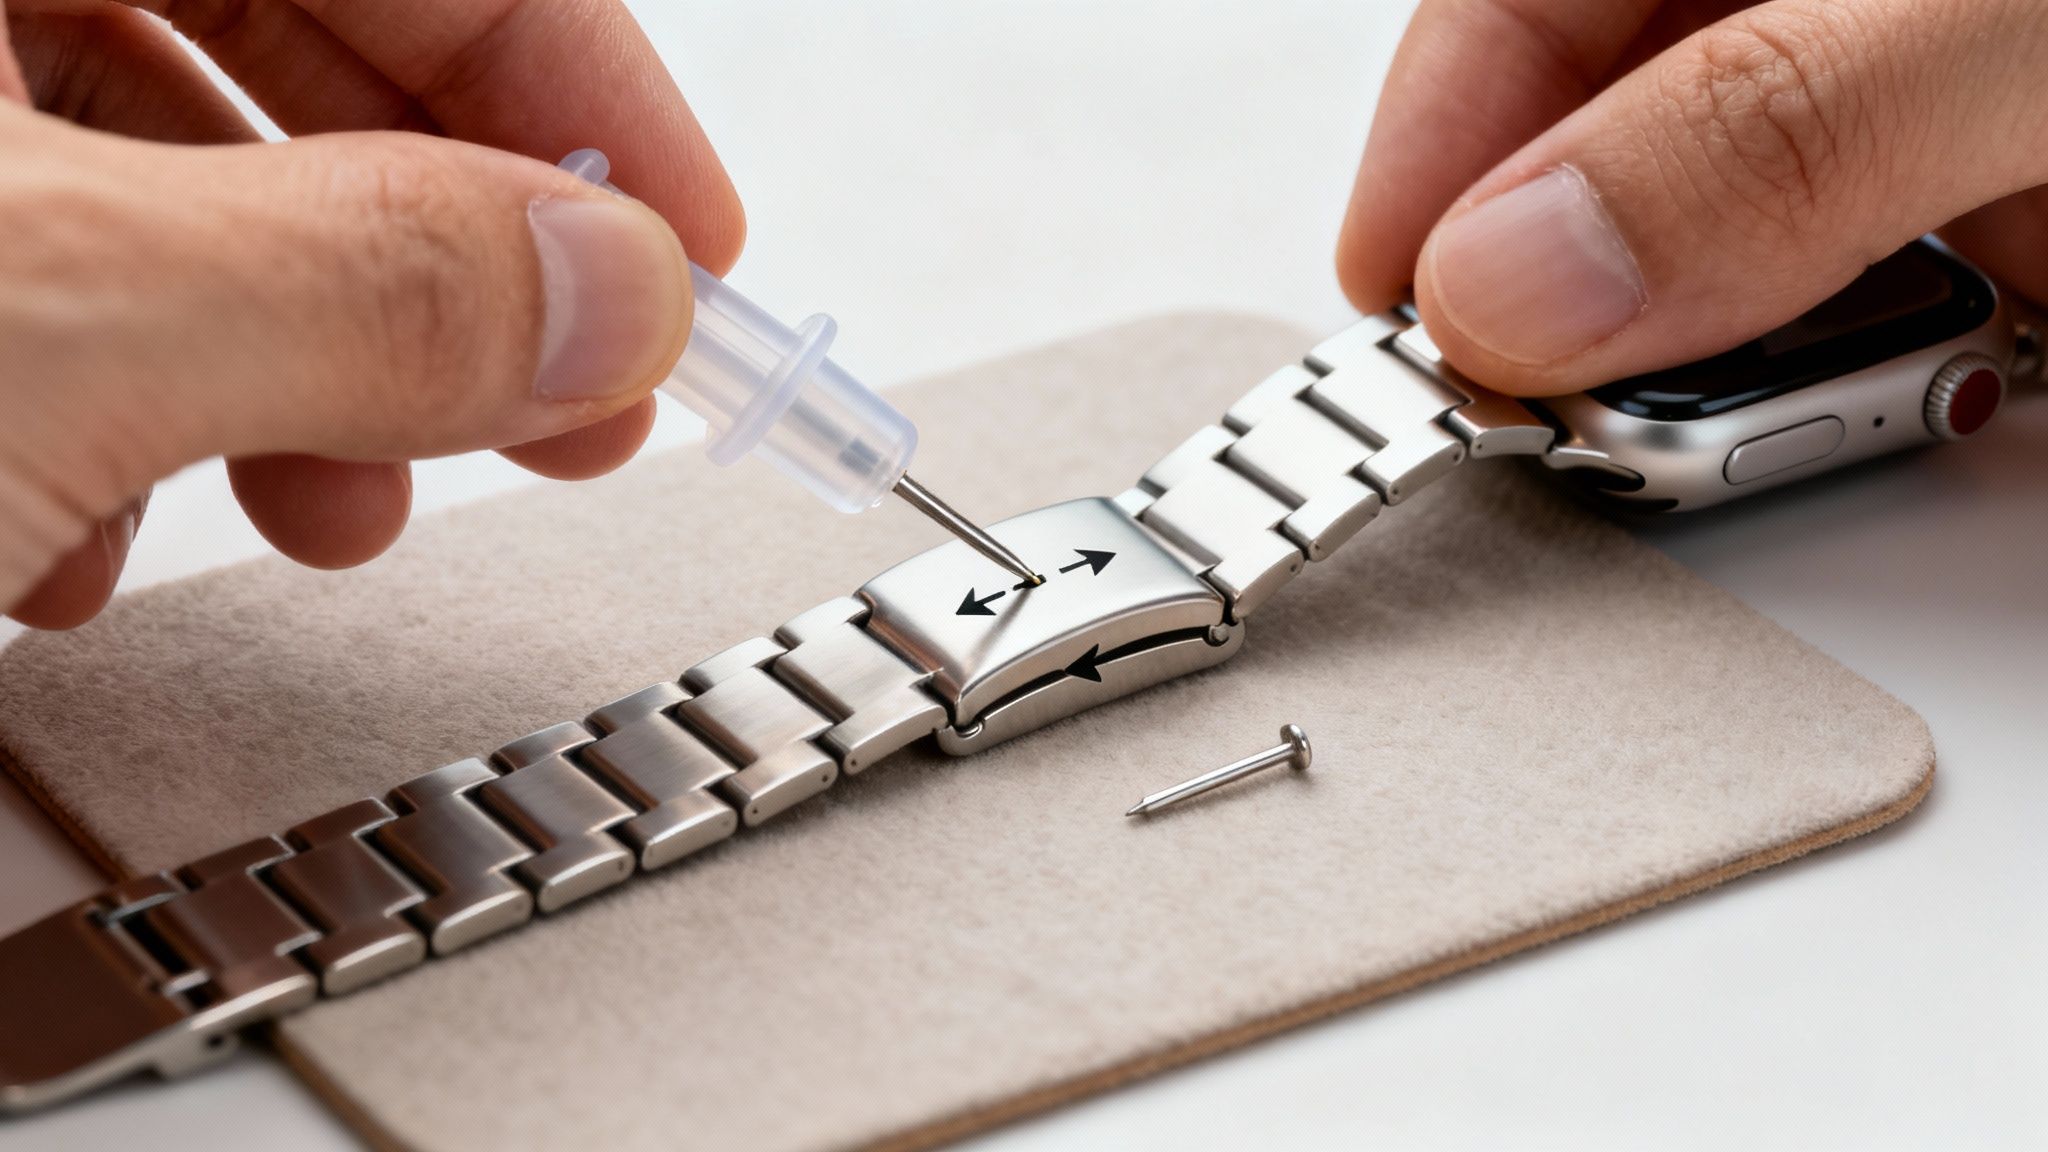
Now, traditional metal link bracelets need a little more hands-on effort to achieve the perfect fit. Most of these bands come with a small, specialised tool for pushing the pins out of each link. It’s not a difficult job, but it does call for a steady hand and a bit of patience.
First things first, find a clean, well-lit space and lay down a soft cloth. A microfibre cloth on your desk is perfect. This prevents any accidental scratches and, more importantly, stops those tiny pins from rolling off into the abyss.
With your band laid out, look closely at the inner side. You should spot tiny arrows etched into some of the links.
- Follow the Arrows: These are crucial. They show you which way to push the pin out. Trying to force it against the arrow can easily damage both the pin and the link.
- Use the Tool: Line up the point of the removal tool with the pin you want to remove. Slowly and gently turn the handle, applying steady pressure until the pin starts to poke out from the other side.
- Remove and Reconnect: Pop out as many links as you need for a comfortable fit. To reconnect the bracelet, simply push a pin back in, making sure you push it in against the direction of the arrow.
Pro Tip: Always try to remove the same number of links from both sides of the clasp. This simple step keeps the clasp centred on the underside of your wrist, making the watch feel much more balanced and comfortable to wear.
Getting the sizing right makes a huge difference in both the look and feel of your watch. If you want a more detailed walkthrough, our complete guide on how to remove watch band links breaks down every single step to make it foolproof.
Tackling Common Band-Swapping Problems
While swapping bands is usually a breeze, everyone runs into a bit of trouble now and then. One of the most common headaches is a band release button that feels completely stuck, or just won't press down far enough.
When you hit this wall, resist the temptation to grab a metal tool like a screwdriver. That’s a surefire way to scratch your watch case. Instead, try using something like a plastic toothpick or the tip of a ballpoint pen to give you that extra, focused pressure without risking any damage.
Dealing with a Stubborn or Wobbly Band
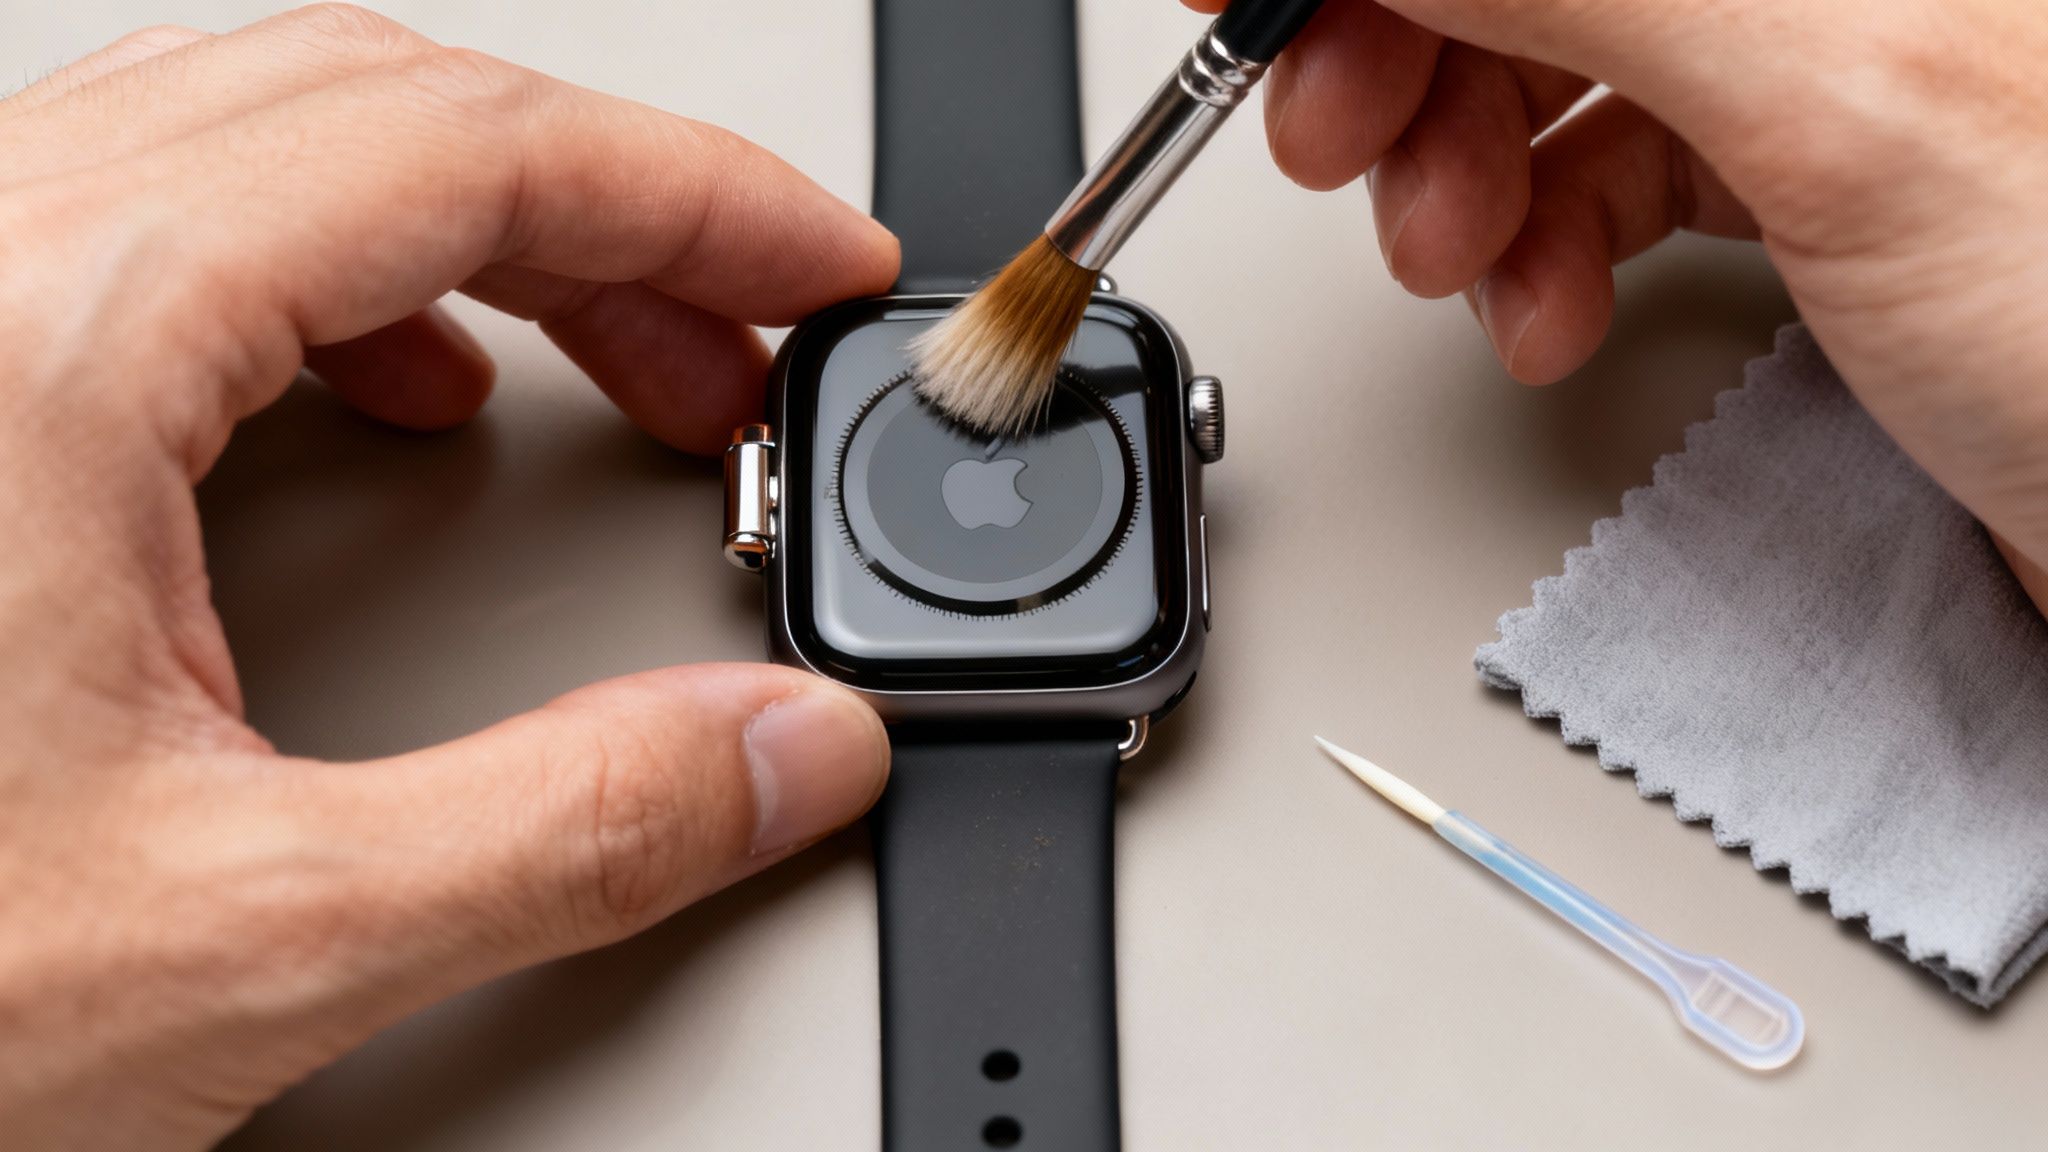
Another classic problem is a band that just won't slide out, even after you've pressed the release button. Nine times out of ten, this isn't a mechanical fault. It's usually just a build-up of dust, skin cells, and other gunk that's gummed up the works inside the channel.
A quick clean is almost always the solution. Grab a soft, dry toothbrush (one you don't use for your teeth!) or a similar small brush and gently scrub out the inside of the band slot. This will dislodge any trapped debris and get things moving smoothly again.
Key Takeaway: If a band won't budge, the culprit is probably grime, not a broken watch. A gentle clean fixes this issue more than 90% of the time, so you can avoid using force that might cause real damage.
You might also find that a new third-party band doesn't give you that satisfying "click" when it locks into place, or it might feel a bit loose and wobbly. This usually boils down to a tiny misalignment with the band’s own connector.
- Check the Alignment: Slide the band back out and try re-inserting it, paying close attention to keeping it perfectly straight and centred as it goes in.
- Inspect the Connector: Take a close look at the metal or plastic ends of the new band. A tiny, leftover bit of material from the manufacturing process can sometimes be enough to stop it from locking in properly.
It’s tricky to find UK-specific data on watch maintenance, but jumping into online forums shows that these small fitment issues are a universal experience. It can be quite reassuring to find out more about these common user discussions online and see how others have solved the exact same problem.
Caring for Your Bands to Ensure They Last
Once you’ve got the hang of swapping out your Apple Watch bands, the next step is making sure they stay in great condition. Looking after your bands properly doesn’t just keep them looking smart; it actually extends their life, protecting your investment. The cleaning method you use really comes down to the material.
Silicone and sport bands, the ones we tend to wear every day, can start to look a bit dull from sweat and lotions. Luckily, a quick wash with mild soap and warm water is usually all they need to look fresh again. For a deeper dive, check out our guide on how to clean silicone watch bands for a like-new look.
Caring for Different Materials
Materials like leather and fabric need a bit more care to prevent any damage. Think of it as a little bit of upkeep for your favourite styles.
- Leather Bands: The golden rules here are to keep them dry and out of direct sunlight. A good quality leather conditioner, applied every few months, will keep the material supple and stop it from cracking over time.
- Nylon & Fabric Bands: If you have a woven style like a Sport Loop, hand-washing is the way to go. Just use a tiny drop of gentle detergent in cool water to lift away any grime or odours, then let it air dry completely before wearing it again.
- Stainless Steel Bands: For link bracelets or Milanese Loops, a simple polish with a soft, lint-free microfibre cloth is perfect. It’s a great way to buff out fingerprints and keep that shine.
Spending a few minutes on routine care keeps your collection looking as good as new. It’s a small bit of effort that makes a huge difference in the long run.
Taking care of your bands is a crucial part of owning them, especially as the market for accessories like these has seen a small dip in growth recently. You can learn more about Apple Watch band market trends to see how consumer habits are changing.
Got Questions About Your Apple Watch Band?
Changing your Apple Watch band is usually a breeze, but a few questions always pop up, especially when you're doing it for the first time. Let's run through some of the common queries I hear all the time.
Do I Need Special Tools to Change the Band?
For about 99% of Apple Watch bands, the answer is a firm no. Apple's brilliant quick-release system is designed to be completely tool-free. Whether you're swapping a Sport Band, a Solo Loop, or a leather strap, all you need are your hands.
The only time you might see a tool is with a metal link bracelet. These often come with a small pin-pusher, but that’s strictly for removing links to get the right fit on your wrist—not for attaching the band to the watch itself.
Can I Use Any Old Watch Strap on My Apple Watch?
Not directly, no. A standard watch strap from a traditional timepiece won't fit into the Apple Watch's unique lug system. However, the world of third-party bands is massive!
As long as a band is made specifically for the Apple Watch and matches your case size group (either the 38/40/41mm models or the larger 42/44/45/49mm ones), you're good to go. Just remember to check the product details for compatibility before buying.
One thing I always tell people is to be mindful of third-party quality. A poorly made connector might not lock in securely. After you attach a new band, always listen for that satisfying "click" and give it a gentle tug to make sure it's not going anywhere.
What if My Band Gets Stuck?
First off, don't panic and definitely don't try to force it out. This almost always happens because a bit of dust, grime, or lint has worked its way into the channel.
The fix is usually simple: grab a soft, dry toothbrush and gently clean out the lug. That tiny bit of maintenance is almost always enough to get the band sliding out smoothly again, and it saves you from potentially damaging your watch.
Ready to find a new look? Nothing But Bands has a massive collection of high-quality, comfortable, and stylish bands for every occasion. Explore our full range of Apple Watch bands today!