30-day comfort guarantee · Easy exchanges
In stock · Ready to ship
Build your rotation · 2nd strap −50%
-
Apple Bands -
Fitbit Bands -
Samsung Bands -
Garmin Bands Forerunner® Bands- Forerunner® 970
- Forerunner® 965
- Forerunner® 955
- Forerunner® 945 LTE
- Forerunner® 945
- Forerunner® 935
- Forerunner® 745
- Forerunner® 645
- Forerunner® 570 - 47mm
- Forerunner® 570 - 42mm
- Forerunner® 55
- Forerunner® 265
- Forerunner® 255 Music
- Forerunner® 245 Music
- Forerunner® 245
- Forerunner® 165 Music
- Forerunner® 165
Fēnix® Bands- fēnix® 8 — 51mm
- fēnix® 8 — 47mm
- fēnix® 8 – 51 mm, AMOLED
- fēnix® 8 – 51 mm
- fēnix® 8 – 47 mm, Solar
- fēnix® 8 – 47 mm, AMOLED
- fēnix® 8 Pro – 47 mm, AMOLED
- fēnix® 7X Pro – Solar Edition
- fēnix® 7X Pro – Sapphire Solar Edition
- fēnix® 7X (51 mm)
- fēnix® 7 Pro – Sapphire Solar Edition
- fēnix® 7 (47 mm)
- fēnix® 6X - Sapphire Editions
- fēnix® 6X - Pro
- fēnix® 6 – Standard Edition
- fēnix® 6 - Sapphire Editions
- fēnix® 6 - Pro Solar Edition
- fēnix® 6 - Pro
- fēnix® 5X Plus
- fēnix® 5X
- fēnix® 5
- fēnix® 3 Sapphire
- fēnix® 3 HR
- fēnix® 3
Instinct® Bands- Instinct® 3 – 50 mm, Solar
- Instinct® 3 – 50 mm, AMOLED
- Instinct® 3 – 45 mm, Solar, Tactical Edition
- Instinct® 3 – 45 mm, Solar
- Instinct® 3 – 45 mm, AMOLED
- Instinct® 2X Solar
- Instinct® 2 Solar - Tactical Edition
- Instinct® 2 Solar
- Instinct® Crossover - Standard Edition
- Instinct® Crossover AMOLED
- Instinct® Crossover AMOLED - Tactical Edition
- Instinct® Crossover Solar
- Instinct® Crossover Solar - Tactical Edition
- Instinct® E – 45 mm
- Instinct® Solar – Standard Edition
- Instinct® Solar – Tactical Edition
- Instinct® – Standard Edition
- Instinct® – Tactical Edition
MARQ® Bands- MARQ® Adventurer
- MARQ® Adventurer (Gen 2)
- MARQ® Adventurer (Gen 2) - Damascus Steel Edition
- MARQ® Adventurer Performance Edition
- MARQ® Athlete
- MARQ® Athlete (Gen 2)
- MARQ® Athlete (Gen 2) - Carbon Edition
- MARQ® Athlete Performance Edition
- MARQ® Aviator
- MARQ® Aviator (Gen 2)
- MARQ® Aviator Performance Edition
- MARQ® Captain
- MARQ® Captain (Gen 2)
- MARQ® Captain: American Magic Edition
- MARQ® Commander
- MARQ® Commander (Gen 2) - Carbon Edition
- MARQ® Driver
- MARQ® Driver Performance Edition
- MARQ® Golfer
- MARQ® Golfer (Gen 2)
- MARQ® Golfer (Gen 2) - Carbon Edition
Tactix® Bands- tactix® 8 – 51 mm Solar, Elite
- tactix® 8 – 51 mm Solar
- tactix® 8 – 51 mm AMOLED
- tactix® 8 – 47 mm, AMOLED
- tactix® 7 – Standard Edition
- tactix® 7 – Pro Edition
- tactix® 7 – Pro Ballistics Edition
- tactix® 7 – AMOLED Edition
- tactix® 7
- tactix® Bravo
- tactix® Charlie
- tactix® Delta - Sapphire Edition
- tactix® Delta - Solar Edition
- tactix® Delta - Solar Edition with Ballistics
-
Help
Log in
Reset password
Create an account
Your bag(0)
Your cart is empty
Continue ShoppingSearch
-
Apple Bands
- Apple Watch Series
- Apple Watch Ultra
- Apple Watch SE
-
- Fitbit Bands
-
Samsung Bands
- Galaxy Watch 8 / 8 Classic
- Galaxy Watch Ultra
- Galaxy Watch 7 / 7 Pro
- Galaxy Watch 6 / 6 Classic
- Galaxy Watch 5 / 5 Pro
- Galaxy Watch 4 / 4 Classic
- Galaxy Watch 3 Bands
- Galaxy Watch (2018) Bands
- Galaxy Watch Active Bands
- Gear Watch Bands
-
-
Garmin Bands
- Approach® Bands
- D2™ Bands
- Descent™ Bands
- Enduro™ Bands
- Epix™ Bands
-
Forerunner® Bands
- Forerunner® 970
- Forerunner® 965
- Forerunner® 955
- Forerunner® 945 LTE
- Forerunner® 945
- Forerunner® 935
- Forerunner® 745
- Forerunner® 645
- Forerunner® 570 - 47mm
- Forerunner® 570 - 42mm
- Forerunner® 55
- Forerunner® 265
- Forerunner® 255 Music
- Forerunner® 245 Music
- Forerunner® 245
- Forerunner® 165 Music
- Forerunner® 165
- Foretrex® Bands
-
Fēnix® Bands
- fēnix® 8 — 51mm
- fēnix® 8 — 47mm
- fēnix® 8 – 51 mm, AMOLED
- fēnix® 8 – 51 mm
- fēnix® 8 – 47 mm, Solar
- fēnix® 8 – 47 mm, AMOLED
- fēnix® 8 Pro – 47 mm, AMOLED
- fēnix® 7X Pro – Solar Edition
- fēnix® 7X Pro – Sapphire Solar Edition
- fēnix® 7X (51 mm)
- fēnix® 7 Pro – Sapphire Solar Edition
- fēnix® 7 (47 mm)
- fēnix® 6X - Sapphire Editions
- fēnix® 6X - Pro
- fēnix® 6 – Standard Edition
- fēnix® 6 - Sapphire Editions
- fēnix® 6 - Pro Solar Edition
- fēnix® 6 - Pro
- fēnix® 5X Plus
- fēnix® 5X
- fēnix® 5
- fēnix® 3 Sapphire
- fēnix® 3 HR
- fēnix® 3
-
Instinct® Bands
- Instinct® 3 – 50 mm, Solar
- Instinct® 3 – 50 mm, AMOLED
- Instinct® 3 – 45 mm, Solar, Tactical Edition
- Instinct® 3 – 45 mm, Solar
- Instinct® 3 – 45 mm, AMOLED
- Instinct® 2X Solar
- Instinct® 2 Solar - Tactical Edition
- Instinct® 2 Solar
- Instinct® Crossover - Standard Edition
- Instinct® Crossover AMOLED
- Instinct® Crossover AMOLED - Tactical Edition
- Instinct® Crossover Solar
- Instinct® Crossover Solar - Tactical Edition
- Instinct® E – 45 mm
- Instinct® Solar – Standard Edition
- Instinct® Solar – Tactical Edition
- Instinct® – Standard Edition
- Instinct® – Tactical Edition
-
MARQ® Bands
- MARQ® Adventurer
- MARQ® Adventurer (Gen 2)
- MARQ® Adventurer (Gen 2) - Damascus Steel Edition
- MARQ® Adventurer Performance Edition
- MARQ® Athlete
- MARQ® Athlete (Gen 2)
- MARQ® Athlete (Gen 2) - Carbon Edition
- MARQ® Athlete Performance Edition
- MARQ® Aviator
- MARQ® Aviator (Gen 2)
- MARQ® Aviator Performance Edition
- MARQ® Captain
- MARQ® Captain (Gen 2)
- MARQ® Captain: American Magic Edition
- MARQ® Commander
- MARQ® Commander (Gen 2) - Carbon Edition
- MARQ® Driver
- MARQ® Driver Performance Edition
- MARQ® Golfer
- MARQ® Golfer (Gen 2)
- MARQ® Golfer (Gen 2) - Carbon Edition
- Quatix® Bands
-
Tactix® Bands
- tactix® 8 – 51 mm Solar, Elite
- tactix® 8 – 51 mm Solar
- tactix® 8 – 51 mm AMOLED
- tactix® 8 – 47 mm, AMOLED
- tactix® 7 – Standard Edition
- tactix® 7 – Pro Edition
- tactix® 7 – Pro Ballistics Edition
- tactix® 7 – AMOLED Edition
- tactix® 7
- tactix® Bravo
- tactix® Charlie
- tactix® Delta - Sapphire Edition
- tactix® Delta - Solar Edition
- tactix® Delta - Solar Edition with Ballistics
- Venu® Bands
- Vívoactive® Bands
- Vívomove® Bands
- Other Garmin Bands
-
- Help
$
USD / EN

How to adjust metal watch band: the perfect fit made simple
- January 11, 2026
- |
- Eugene
Nothing beats the timeless look of a metal watch band, but getting the fit just right is crucial. If it's too loose, it'll slide around your wrist; too tight, and it's just plain uncomfortable. Luckily, adjusting it yourself is easier than you might think. Most of the time, it comes down to two simple jobs: removing a few links for a major size change, or tweaking the clasp’s micro-adjustment pins for that perfectly tailored feel.
Your Guide to a Perfectly Fitted Watch
Nailing that custom-fit feel from the comfort of your own home is a genuine game-changer. With so many of us in the UK now buying watches online, popping down to the local jeweller isn't always an option. This guide will give you the confidence to get a secure, comfortable fit that makes your watch look and feel like it was made just for you.
This whole DIY trend has really taken off alongside the smartwatch boom. For anyone owning a device from Apple, Samsung, or Garmin, learning how to adjust a metal band has become a must-have skill. It’s a simple case of necessity—when you order online, you become your own watch-fitter.
Of course, a great fit starts with knowing your wrist size. Before you grab any tools, have a quick read of our guide on https://nothingbutbands.com/blogs/news/how-to-measure-wrist-size-for-watch. It’s the perfect starting point.
A well-adjusted band isn't just about comfort; it's about function. For smartwatches, a snug fit ensures sensors maintain proper skin contact for accurate health and fitness tracking.
And hey, these skills come in handy for more than just watches. If you're keen on applying these DIY adjustment techniques to other accessories, you can learn about safe DIY methods for resizing a ring at home.
2. Get Your Tools Ready
Before you even think about popping out a pin, let's talk about setting yourself up for success. Getting a metal watch band to fit just right is all about having the correct tools on hand. Trust me, trying to improvise with a paperclip or a thumbtack is a surefire way to scratch your prized watch or send a tiny pin flying into the unknown.
You don't need a professional jeweller's workbench, but a few specific, inexpensive items will make this job a hundred times easier and safer for your timepiece.
What You'll Absolutely Need
The star of the show is a simple watch band link remover kit. You can find these online for next to nothing, and they're worth their weight in gold. The most important part of this kit is the pin pusher tool, which lets you apply steady, precise pressure to push out the pins holding the links together.
Think of it this way: the pin pusher does the delicate work, so you don't have to.
To make the whole process go smoothly, it's a good idea to have a few other things ready. Here's a quick rundown of the essentials.
Here is a quick reference guide to the tools you'll need and why each one is important for a successful adjustment.
| Tool Name | Primary Use | Pro Tip |
|---|---|---|
| Pin Pusher Tool | Applies precise pressure to remove link pins. | The cornerstone of any kit. Make sure it has several tip sizes to match your band. |
| Watch Band Holder | A plastic block that holds the band steady. | Frees up both of your hands and prevents the band from slipping at a critical moment. |
| Small Jeweller's Hammer | Gently tapping pins out or back into place. | Use light, controlled taps. You're persuading the pin, not forcing it. |
| Spring Bar Tool | Releasing the spring bar at the clasp for micro-adjustments. | Invaluable for fine-tuning the fit once you've removed the right number of links. |
| Pliers (Needle-Nose) | Grasping and pulling out stubborn pins. | Wrap the tips in a bit of tape to avoid scratching the band. |
Having these items laid out and ready to go will turn a potentially frustrating task into a satisfying five-minute job.
My Personal Tip: Always work on a soft, clean surface. I use a simple microfibre cloth, but a mouse mat or even a folded tea towel works perfectly. It protects your watch crystal from scratches and gives you a dark background, making it easier to spot any tiny parts you drop.
And one last thing – make sure you have good lighting! You'll be dealing with tiny pins and even tinier arrows on the links, so being able to see clearly is half the battle.
How to Remove Links From Your Watch Band
Alright, this is where we get hands-on. Taking links out is the classic way to shorten a metal watch band, and once you get the hang of it, you’ll be able to dial in the perfect fit in minutes—no trip to the jeweller required.
First things first, you need to figure out which links are actually designed to be removed. Flip the watch band over and take a close look at the inner side. You should spot tiny arrows engraved on some of the links, usually the ones closest to the clasp. These arrows are your guide; they show you the one and only direction the pins should be pushed out. Trying to force a pin against the arrow is a surefire way to damage the band, so pay close attention here.
This illustration shows the simple tools that make the job a breeze.
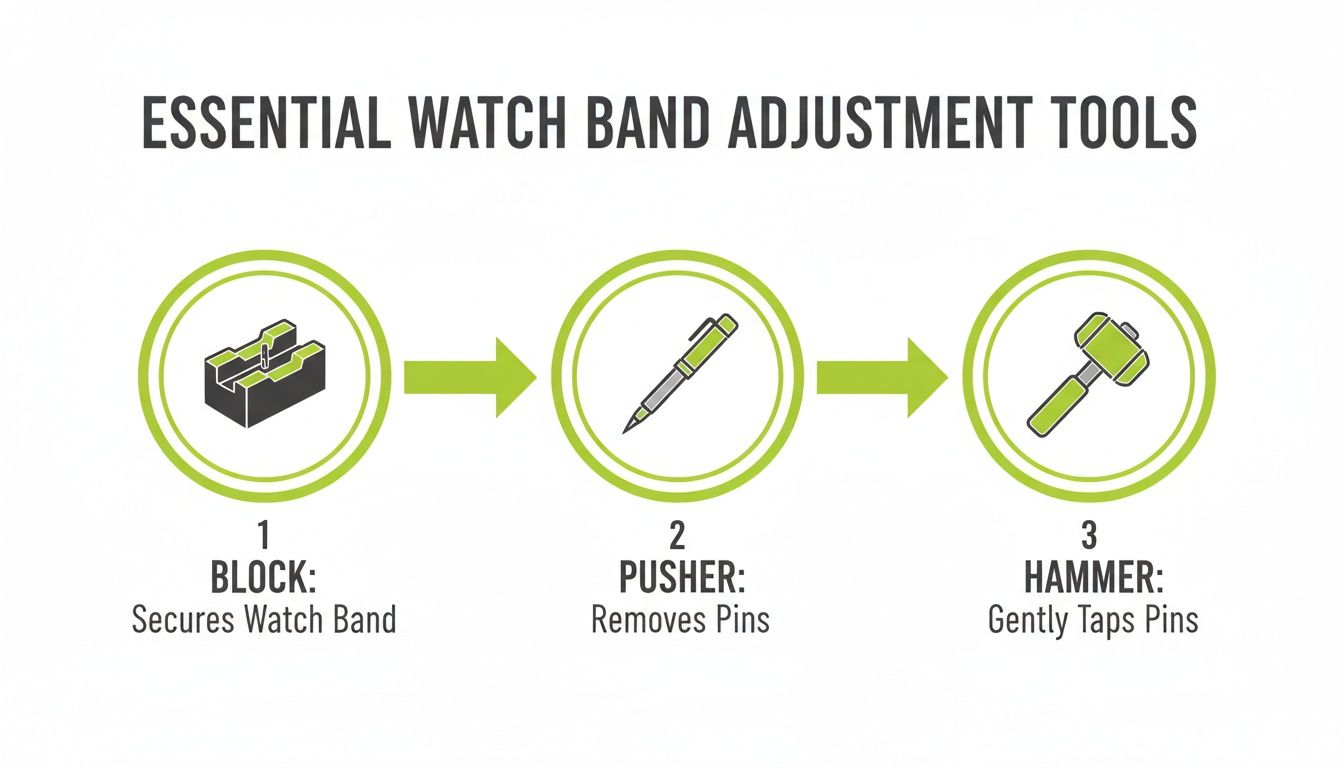
As you can see, each tool has a specific job—the block holds everything steady, the pusher applies precise pressure, and the hammer helps finish the job.
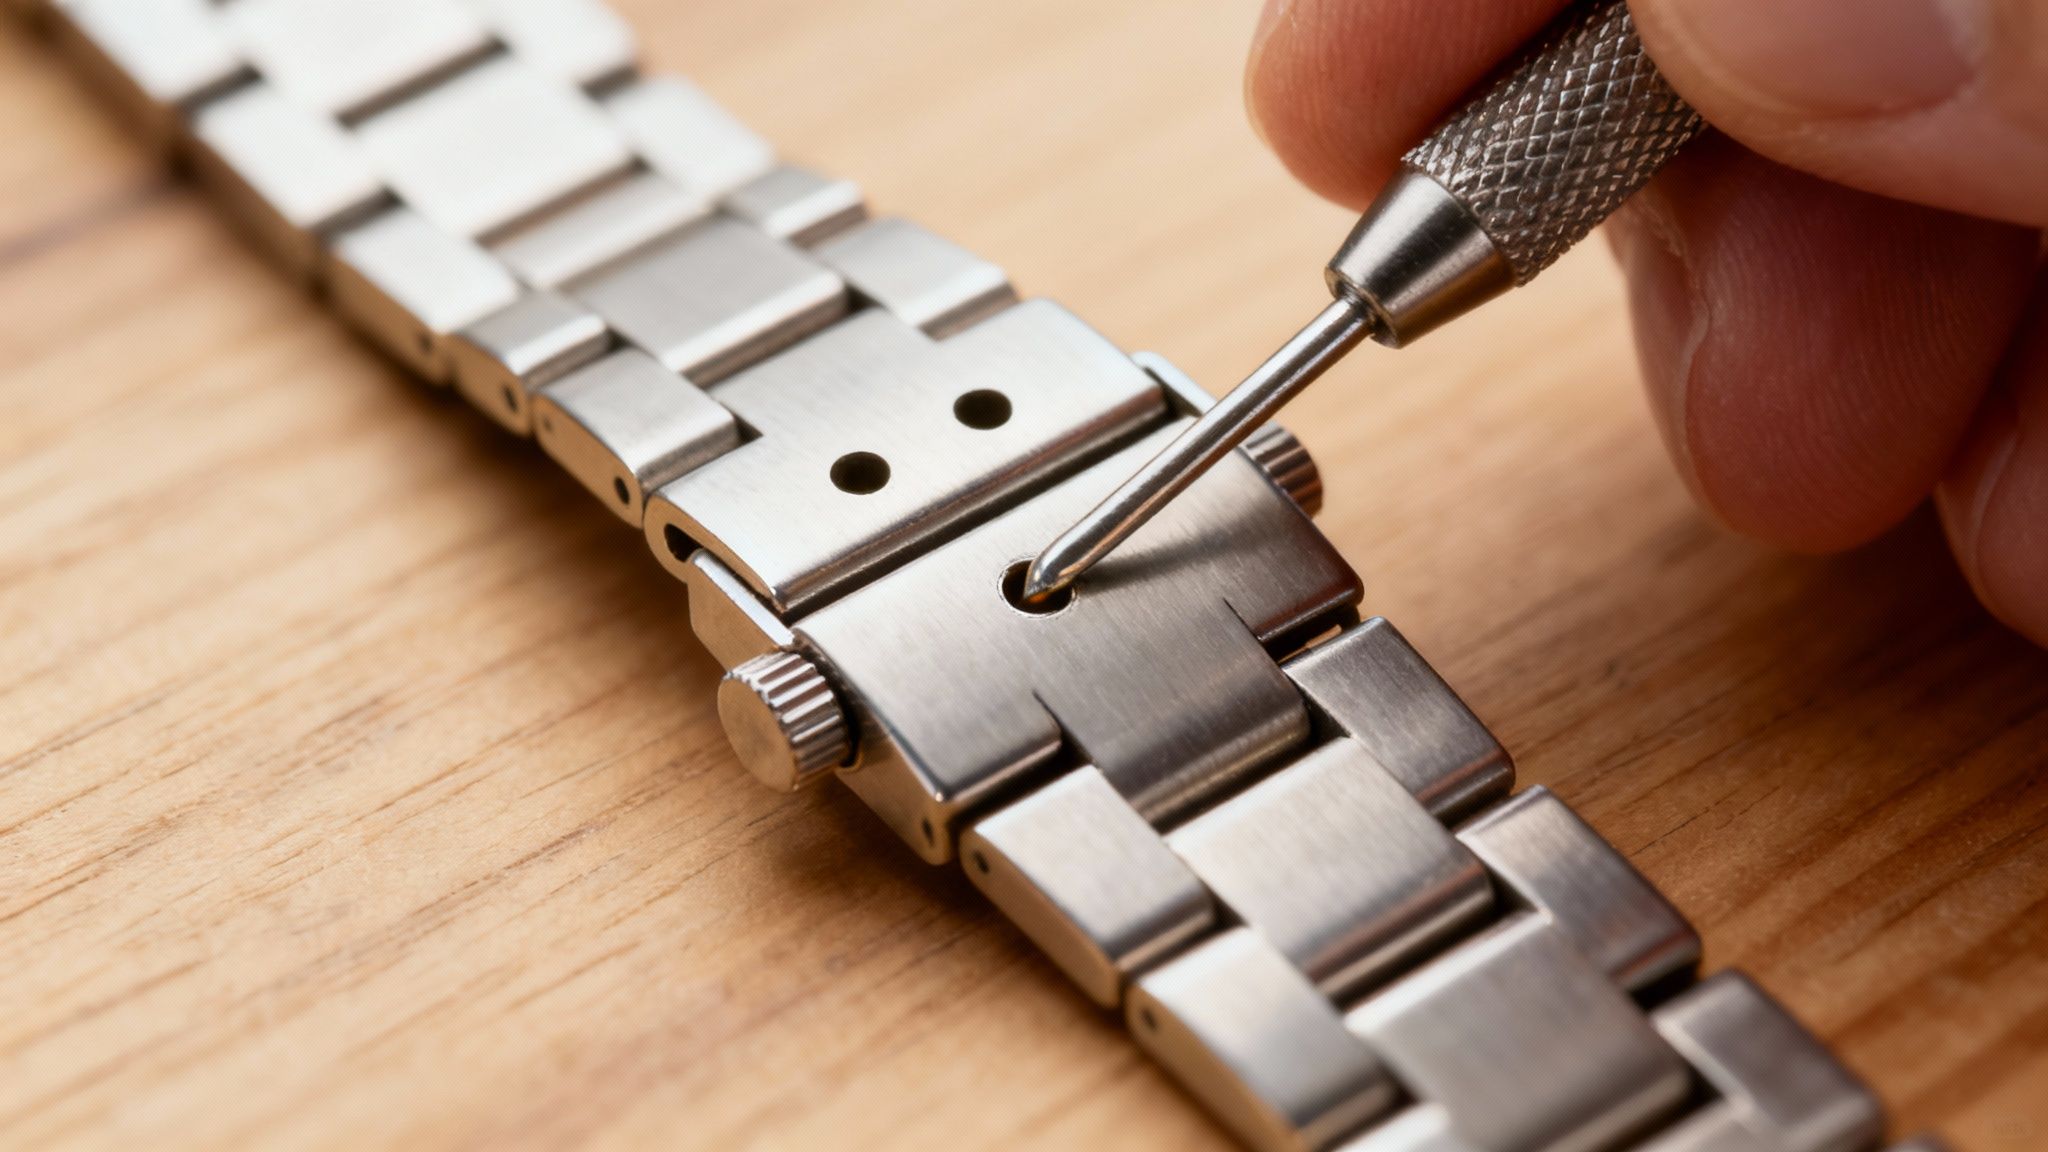
Aligning and Removing the Pin
Once you’ve identified the links you want to remove, place the band into the watch band holder block. You'll want to position it so the arrow on the link is pointing downwards, lining up with the opening in the block. This gives the pin a clear path to exit.
Next, take your pin pusher tool and align its tip with the head of the pin. Make sure it's sitting nice and flat. Slowly and steadily turn the handle of the tool to apply gentle pressure. You'll feel a little 'pop' as the pin starts to move. Keep turning until it’s pushed out far enough for you to grab with your fingers or a small pair of pliers.
Expert Tip: Always push the pin out in the direction of the arrow. Watch pins aren't just straight rods; one end is often split or has a tiny collar to create a friction fit inside the link. Forcing it out the wrong way can wedge it in place or even warp the link.
Detaching the Link and Reconnecting the Band
With the pin removed, the link will come away easily. Just repeat the process for the pin on the other side of the link or section you're taking out. It's always a good idea to remove an equal number of links from both sides of the clasp; this helps keep the watch head centred and balanced on your wrist.
If you'd like a more in-depth guide, we have a dedicated article that offers more tips on how to remove watch band links.
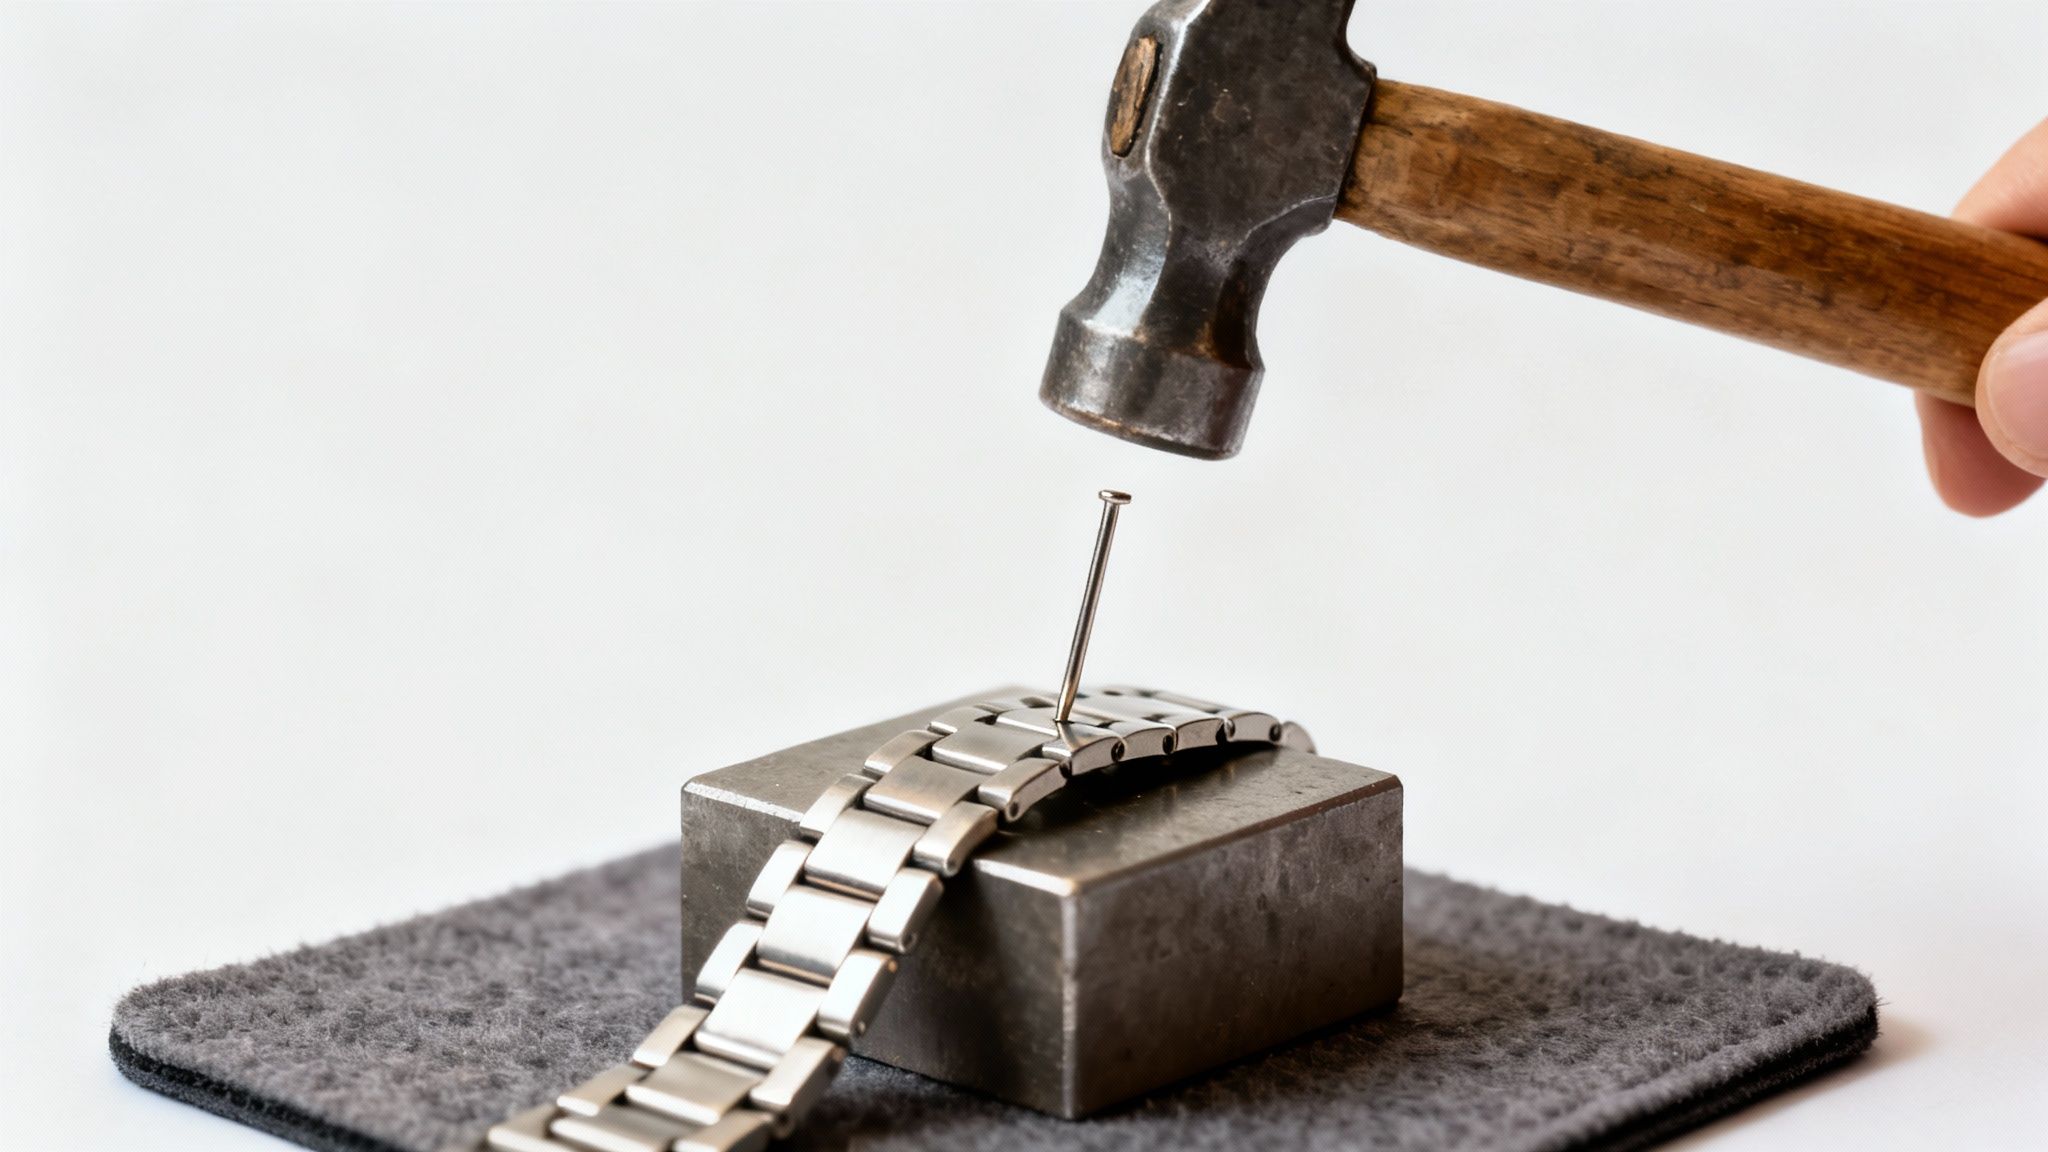
Putting it all back together is just as simple. Line up the two ends of the band you want to join and slide the pin back in, this time pushing it in against the direction of the arrow. Get it in as far as you can with your finger, then use the small watch hammer to give it a few light taps until it sits flush with the side of the link. That's it—your band is now a custom fit
Fine-Tuning Your Fit with Clasp Micro-Adjustments
Ever removed a link only to find your watch is now a hair too tight, or still just a little too loose? It’s a common problem, but the solution is often built right into the clasp itself. These micro-adjustment holes are the secret to achieving that perfect, made-for-you fit.
This feature is a real game-changer because our wrists naturally swell and shrink throughout the day with changes in temperature or activity. A quick tweak at the clasp means you can have a slightly looser fit for a workout and then snug it up for a formal event. Learning how to make this small adjustment is what truly makes a watch feel like your own.
This isn't just a comfort thing; for smartwatch users, a precise fit is critical. Heart rate and other sensors need consistent skin contact to work properly, and micro-adjustments are the only way to guarantee that.
How to Use the Spring Bar Holes
Take a close look at the side of your watch clasp. You should see a row of tiny holes. Hidden inside, a spring bar holds the bracelet in place. Your goal is to simply move this spring bar from one hole to another to slightly shorten or lengthen the band.
You’ll want a spring bar tool for this, but a small pin pusher can work in a pinch. Here’s how it’s done:
- Slip the forked tip of your tool into the gap between the clasp wall and the bracelet link.
- Feel for the ridged end of the spring bar and gently push to compress the spring.
- With the spring compressed, carefully wiggle that end of the bar out of its current hole.
- Slide it over to the hole that gives you a better fit—move it further into the clasp to tighten, or closer to the end to loosen. Let it go, and you should hear a satisfying 'click' as it locks in.
It sounds more complicated than it is. This quick adjustment offers a level of precision you just can't get from removing whole links. For Apple Watch fans who want the ultimate in adjustability, our guide to the infinitely adjustable Milanese Apple Watch band might be right up your street.
For many of us in the UK, getting the fit right is a must. Optical heart rate and SpO₂ sensors can give patchy readings if a metal bracelet is too loose. In a market where smartwatches account for over 55.97% of fitness tracker revenue, the band's fit is a huge part of the experience. You can read more about the growing UK fitness tracker market online.
Common Mistakes to Avoid During Adjustment
Even the most straightforward adjustment can hit a snag, but don't worry—most mishaps are easy to fix. Knowing the common pitfalls before you start is the best way to ensure a smooth, scratch-free process when you're resizing your watch strap at home.
One of the most frequent errors I see is trying to force a pin out against the direction of the arrow. Those little arrows aren't just for decoration; they show you the only way the pin is designed to come out. If you feel any serious resistance, stop immediately. Take a moment, double-check the arrow, and make sure your tool is perfectly aligned. A little patience here will save you from a bent pin or a damaged link.
Another classic mistake is working on the wrong surface. Placing your watch directly on a hard table is just asking for scratches on the crystal or clasp. Always lay down a soft microfibre cloth or use a proper watch holder to keep everything protected.
Dealing with Stubborn Pins
Every so often, a pin just refuses to budge, even when you’re pushing in the correct direction. It happens.
- Check your tool alignment: Before applying more force, make sure the pin pusher's tip is dead centre on the pin and not slipping to one side.
- Try a gentle tap: If you're using a link remover block, try giving the end of your pin pusher a few gentle taps with a small watchmaker's hammer. Often, that little bit of vibration is all it takes to loosen a stuck pin.
A lot more people are resizing their own watches these days. A local jeweller might quote you £10–£20 and ask you to come back later, but a simple push-pin system can be sorted at home in just a few minutes.
With the British watchmaking sector's value now at £206 million as of April 2024, many workshops are focusing on more complex, higher-value repairs. This makes learning to handle a simple DIY adjustment for your smartwatch a really practical skill. You can read more about the growth of the British watch industry if you're interested.
By keeping these simple tips in mind, you can get a perfect, professional-looking fit without any of the stress.
Answering Your Watch Band Adjustment Questions
Even with a good guide in hand, it’s natural to have a few questions when you’re staring at a new metal watch band for the first time. Let’s tackle some of the most common queries I hear, just to give you that extra bit of confidence before you start.
How Many Links Should I Actually Remove?
First, put the watch on and pinch the slack together underneath your wrist. This gives you a surprisingly accurate visual on how many links need to come out.
For a balanced, comfortable fit, it's crucial to remove an equal number of links from both sides of the clasp. This simple trick keeps the watch head perfectly centred on your wrist, so it doesn't flop over to one side.
My go-to rule for the perfect fit? You should just be able to slide a single finger between the band and your wrist. It’ll be snug enough for any smartwatch sensors to work properly but won't feel like it’s cutting off your circulation.
My best advice is to take it slow. Remove just one or two links, reassemble the clasp, and try it on. It’s far easier to take another link out than it is to put one back in after you’ve gone too far.
Once your watch fits perfectly, you might want to give it a good clean. Knowing how to clean tarnished jewelry is a handy skill that keeps all your accessories looking their best.
What’s the Difference Between Push-Pins and Screw-In Links?
Before you pick up a tool, you absolutely need to know what you're working with. Metal bands generally use one of two systems: push-pins or screws.
- Push-Pins: These are the most common type you'll find, especially on bands for brands like Samsung and Garmin. They’re held in place by friction. The giveaway is the small directional arrows on the inside of the links. You’ll need a pin pusher tool to get these out.
- Screw-In Links: Typically found on higher-end watches, these links are secured with tiny, threaded screws. For these, you’ll need a jeweller’s screwdriver. Trying to use a pin pusher tool here is a fast track to damaging your band.
When Should I Just Take My Watch to a Professional?
Most of the time, this is an easy DIY job. However, there are a few situations where it's smarter to head to a jeweller.
If you come across a pin that absolutely refuses to budge, or if you accidentally bend a link while trying to force it, just stop. A professional has specialised tools to deal with stubborn parts without wrecking your watch. Trust me, paying a small fee for an expert’s help is always better than risking permanent damage to a valuable timepiece.
At Nothing But Bands, we believe finding the perfect strap should be simple. Explore our collections for Apple Watch, Samsung, and Garmin to find a style that offers the perfect fit right out of the box. Find your new favourite at https://nothingbutbands.com.